
Why This 30-Day Waffle Recipe Challenge Will Transform Your Breakfast Game
A waffle recipe doesn’t have to be complicated – but mastering the perfect crispy-outside, fluffy-inside texture takes practice. Here’s what you need to know right now:
Essential Waffle Recipe Basics:
- 2¼ cups flour + 2 tsp baking powder for lift
- 2 eggs separated (whip whites for extra fluff)
- 1¾ cups milk + ½ cup melted butter for richness
- Cook 4-5 minutes until golden and steam stops
The best waffle recipes share one secret: separating your eggs and folding in whipped whites creates restaurant-quality results. As one home cook finded after trying the Spend With Pennies recipe (rated 4.97 stars from over 1,300 votes): “These are the best light and crispy homemade waffles ever!”
Why waffles matter for food lovers: They’re the perfect canvas for global flavors and sustainable dining choices. From Norwegian brunost cheese waffles to banana leaf-wrapped street food alternatives, mastering this foundational skill opens doors to authentic culinary experiences.
This 30-day challenge breaks down every technique – from basic batter mixing to advanced Belgian-style methods. You’ll learn timing secrets, troubleshoot common mistakes, and find creative variations that rival any destination breakfast spot.
Whether you’re meal-prepping for busy mornings or hosting weekend brunch gatherings, consistent waffle mastery lifts your entire cooking confidence.

Waffle recipe terms at a glance:
Essential Gear & Ingredients for Perfect Waffles
Let’s be honest – you can’t create restaurant-quality waffles with subpar tools and stale ingredients. The difference between “meh” and “amazing” often comes down to having the right setup from day one.
Think of this as your waffle foundation. Just like you wouldn’t build a house on shaky ground, mastering any waffle recipe starts with solid equipment and fresh pantry staples.

Your essential toolkit includes mixing bowls (at least two for separating wet and dry ingredients), a hand mixer for whipping those crucial egg whites, accurate measuring cups, and a wire rack for keeping finished waffles crispy. Don’t forget a ladle or portion scoop – it prevents the messy batter spills that make your kitchen look like a breakfast battlefield.
Choosing Your Waffle Iron
Here’s where things get interesting. Your waffle iron choice shapes everything about your final results.
Non-stick plates are your best friend for easy release and simple cleanup. Pro tip: lightly brush with oil instead of using cooking spray – it creates better browning without that sticky buildup over time.
The Belgian versus regular debate comes down to personal preference. Belgian irons create those thick, deep-pocketed beauties perfect for holding syrup pools, while regular irons produce thinner, crispier waffles with more surface area for toppings.
Flip models might seem fancy, but they actually distribute batter more evenly for consistent golden color. If you’re serious about waffle perfection, they’re worth the investment.
Look for adjustable heat settings – they give you control over browning and texture. High heat creates crispy exteriors, while medium heat ensures thorough cooking without burning.
Cleaning is simple when done right: always unplug first, let it cool completely, then wipe with a damp cloth. Never submerge in water or use abrasive scrubbers.
Pantry Staples That Make or Break a Waffle
Your ingredients list might look basic, but quality and freshness make all the difference.
All-purpose flour forms your base, though we’ll explore alternatives in Week 4. Fresh baking powder is absolutely crucial – replace it every six months because stale leaveners create flat, dense disasters. Nobody wants breakfast that doubles as a doorstop.
Room-temperature eggs whip easier and incorporate better into batter. This small detail prevents lumpy mixing and creates smoother texture.
For liquid, milk works beautifully, whether dairy or plant-based. Want extra richness? More info about Heavy Cream can lift your weekend special waffles.
The butter versus oil choice affects both flavor and texture. Butter brings rich taste, while oil creates crispier exteriors. Many top recipes use both for the best of both worlds.
Sugar type matters more than you’d think. White sugar caramelizes for crispy edges, while brown sugar adds subtle molasses notes. Salt might seem optional, but it’s essential for balanced flavor – skip it and your waffles taste flat.
Here’s the secret weapon: cornstarch. This humble ingredient creates ultra-crispy textures that rival restaurant waffles. We’ll dive deep into this technique during Week 3.
Measuring accuracy can’t be overstated. Spoon flour into your measuring cup and level it off – scooping directly creates dense, heavy results that nobody dreams about for breakfast.
Step-by-Step 30-Day Plan to Master Every Waffle Recipe Style
Here’s where the magic happens! This waffle recipe journey transforms you from weekend warrior to waffle wizard in just one month. Each week builds on the last, so by day 30, you’ll confidently tackle any style with perfect results every time.
Keep a simple timing log and jot down tasting notes as you go. Trust me—watching your progress unfold is half the fun, and those notes become your personal recipe bible.
Week 1 – Foundational Classic Waffles
Let’s start with the fundamentals. A perfect classic waffle recipe is your foundation for everything that follows, so we’re taking our time here.
Mix your dry ingredients first—whisk together flour, baking powder, sugar, and salt in a large bowl. In a separate bowl, combine your wet ingredients: milk, egg yolks, melted butter, and vanilla. Here’s the game-changer: whip those egg whites to stiff peaks in a third bowl. This extra step creates the light, airy texture that separates good waffles from great ones.
Gently fold everything together—add wet ingredients to dry, then carefully fold in those precious whipped whites. Don’t worry if the batter looks lumpy; that’s exactly what you want! Overmixing develops gluten, which means tough, chewy waffles instead of tender perfection.
Preheat your iron thoroughly before adding batter. A properly heated surface creates that satisfying sizzle when batter hits the plates. Cook for 4-5 minutes until golden brown and the steam stops rising—that’s your visual cue for doneness.
Focus on your tasting notes this week: crisp edges, tender crumb, and that perfect balance of flavors. Master this foundation, and you’re ready for bigger trips.
Week 2 – Light & Fluffy Belgian Waffles
Time to go big! Belgian waffles are the show-stoppers of the waffle world, with deep-pocket grids that create dramatic height and perfect syrup pools.
Your egg white technique becomes crucial here—separate those eggs and beat the whites until they hold firm peaks. This isn’t optional for Belgian waffles; it’s what creates that signature pillowy interior that makes people swoon. The science behind batter aeration shows how incorporating air creates the light texture we’re after.
Want to try something special? A yeast option adds authentic Belgian flavor. Mix your batter the night before and let it rise slowly in the fridge. The gentle fermentation develops complex flavors you simply can’t get with baking powder alone.
Try a buttermilk swap this week too. The natural tang brightens the flavor while the acidity tenderizes the batter, creating an even more luxurious texture. Those deep syrup pools in Belgian waffles aren’t just pretty—they’re functional, holding every delicious drop of your favorite toppings.

Weekly challenge: Make both a yeasted and non-yeasted version. Record which texture you prefer—there’s no wrong answer, just personal preference!
Week 3 – Crispy Cornstarch Crunch Waffles
Ready for the cornstarch secret that transforms ordinary waffles into restaurant-quality masterpieces? This week is all about achieving that shatteringly crisp exterior that makes people ask for your recipe.
Replace about 1/4 of your flour with cornstarch—this simple swap creates an incredibly crispy shell while keeping the inside tender. The science is fascinating: cornstarch browns differently than flour, creating a delicate crunch that stays crispy longer.
Crank up that heat setting and let your iron preheat for at least 10 minutes. A blazing-hot surface essentially “fries” the outside of your batter on contact, sealing in moisture while creating that coveted crunch.
Use an oil and butter blend for maximum effect. Butter brings flavor, but oil has a higher smoke point and contributes to crispiness. Many professional kitchens use this combination for exactly this reason.
Wire-rack cooling is non-negotiable this week. Never stack these beauties! The trapped steam will turn your crispy masterpiece soggy in minutes. Single-layer cooling preserves all that hard-earned crunch.
Week 4 – Creative & Dietary Variations
Let’s get adventurous! This final week opens doors to waffles that fit every lifestyle and taste preference, proving that great texture and flavor aren’t limited to traditional recipes.
Gluten-free blends work beautifully in waffle recipes—use a cup-for-cup substitute and add a splash of extra milk if the batter seems thick. The cornstarch tricks from Week 3 are especially helpful here, adding structure that gluten-free flours sometimes lack.
Dairy-free milk alternatives like oat, almond, or coconut milk each bring subtle flavor differences. Coconut oil makes an excellent butter substitute, adding richness without dairy.
Protein waffles satisfy fitness goals without sacrificing weekend indulgence. Add a scoop of vanilla or unflavored protein powder and adjust your liquid accordingly—the batter should pour easily but not be watery.
Whole-wheat flour adds nutty depth and extra nutrition. Start with a 50-50 blend of whole wheat and all-purpose flour, then adjust to your taste preference.
The beauty of mastering these variations is finding how versatile your basic technique really is. Whether you’re accommodating dietary needs or just craving something different, these skills serve you well beyond breakfast.
For a perfect brunch spread, pair your waffles with our More info about Scones for variety that impresses every guest.
Troubleshooting & Pro Tips for Consistently Epic Results
Even the most passionate home cooks face waffle mishaps. The good news? Most waffle recipe problems have simple fixes that’ll have you flipping perfect golden squares in no time.
Steam is your best friend when timing waffles. When that steady stream of steam stops puffing from your iron, your waffle is ready. It’s nature’s built-in timer, and far more reliable than guessing.
Sticking drives everyone crazy, but it’s usually preventable. Make sure your iron is fully preheated—we’re talking at least 5 minutes of warming up. Even non-stick surfaces benefit from a light brush of oil or melted butter. Cooking sprays can build up over time, so stick with the brush method for consistent results.
Soggy waffles break hearts. The culprit? Trapped steam. Always cool your finished waffles on a wire rack, never stacked on a plate. Air circulation keeps that crispy exterior intact while the inside stays tender.
Undercooked centers happen when you don’t use enough batter or rush the cooking process. Fill your iron’s grid completely—but not to overflowing—and resist the urge to peek too early. Golden color and stopped steam are your cues.
Batter consistency matters more than most people realize. Your mixture should pour easily but not run like water. Too thick? Add milk one tablespoon at a time. Too thin? A sprinkle of flour will thicken things up.
Measuring hacks save the day: Always spoon and level your flour rather than scooping directly from the bag. Crack eggs into a small bowl first to avoid fishing out shell pieces from your beautiful batter.
Storage and reheating can make or break your waffle game. Let waffles cool completely before storing in an airtight container—any trapped moisture will turn crispy edges into chewy disappointments. For reheating, the toaster or air fryer brings back that satisfying crunch, while the microwave sadly turns waffles into sad, steamy pancakes.
| Feature | Belgian Waffles | Regular Waffles |
|---|---|---|
| Grid Depth | Deep, large pockets | Shallow, small pockets |
| Leavening | Yeast or whipped whites | Baking powder/soda |
| Texture | Light, airy, thick | Crisp, thin, tender |
| Best For | Syrup, fruit, whipped cream | Butter, jam, savory toppings |
Keeping Waffles Crispy for a Crowd
Nothing ruins a brunch party like a stack of limp waffles. Here’s how to keep them restaurant-quality when feeding a group.
Set your oven to 200°F and place finished waffles directly on a wire rack inside. This gentle heat keeps them warm without continuing to cook. The key is single-layer spacing—never stack waffles, even when you’re in a hurry. Air circulation is what maintains that coveted crunch.
Timing your reheating makes all the difference. Give waffles 3-5 minutes in the oven or 2-3 minutes in a toaster or air fryer to restore their crispy glory. Your guests will think you’re a breakfast wizard.
Freezing & Reheating Like a Pro
Meal prep enthusiasts, this one’s for you. Properly frozen waffles rival any store-bought version and save precious morning minutes.
Cool completely before freezing—this prevents ice crystals from forming and ruining texture. Layer waffles between parchment or wax paper to prevent sticking. They’ll keep their quality for 3-6 months in the freezer, though they rarely last that long once family members find your stash.
The toaster revival method is pure magic: straight from freezer to toaster slot equals instant weekday breakfast joy. No thawing required, no soggy texture—just crispy, delicious waffles in minutes.

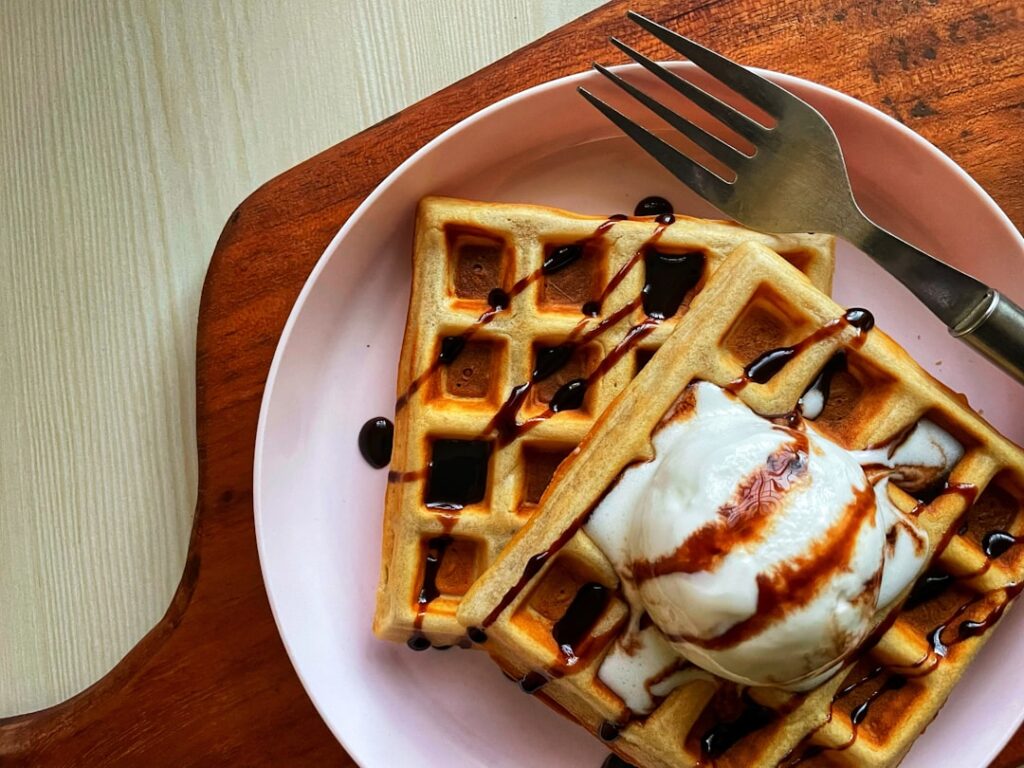
Creative Toppings, Serving Ideas & Sustainability Twists
The beauty of mastering a perfect waffle recipe lies in the endless possibilities for creativity. Once you’ve nailed the technique, your waffles become a canvas for flavors from around the world—and a chance to make more sustainable choices in your kitchen.
Seasonal fruit transforms any waffle into a celebration of the moment. Fresh strawberries and blueberries shine in summer, while roasted apples and pears bring warmth to autumn mornings. The key is letting the fruit’s natural sweetness complement your waffle’s crispy texture.
Beyond the classic maple syrup (though we’ll never tire of that golden perfection), consider whipped mascarpone for an indulgent Italian twist. More info about Mascarpone reveals how this creamy cheese lifts any breakfast into something special.
For those craving savory trips, fried chicken creates the ultimate Southern-inspired brunch experience. The contrast of crispy, seasoned chicken against fluffy waffles is pure magic. Don’t overlook savory herbs either—a sprinkle of fresh chives, dill, or smoked paprika can transform your waffle into an unexpected delight.
Global inspirations open up a world of possibilities. Norwegian waffles topped with sweet brunost cheese offer a Scandinavian experience, while Japanese matcha waffles bring zen to your morning routine. Coconut syrup from tropical traditions adds exotic sweetness that transports you beyond your kitchen.
Setting up a waffle bar turns any gathering into an interactive experience. Your guests become part of the culinary trip, building their own perfect combinations.
DIY Waffle Bar Checklist
Creating the perfect waffle bar means thinking like a host who wants everyone to feel welcome. Small bowls filled with toppings—fresh fruit, toasted nuts, various syrups, and fluffy whipped cream—give guests choices. Label cards become essential for allergy-friendly options, showing you care about every guest’s needs.
A warming tray or low oven keeps your waffles at their crispy best while people mingle and decide on toppings. Portion scoops and tongs make serving easy and hygienic, letting everyone create their masterpiece without mess.

Turning Leftovers into Desserts
Leftover waffles (if such a thing exists in your house) deserve a second act as spectacular desserts. Ice-cream sandwiches made by pressing softened ice cream between two waffle squares, then freezing and dipping in chocolate, rival any store-bought treat.
For coffee lovers, try an affogato-style waffle—top a warm waffle with vanilla gelato and pour hot espresso over everything. More info about Affogato shows how this Italian tradition adapts beautifully to American breakfast favorites.
Consider a classic French dessert mashup by turning leftover waffles into pain perdu (French toast-style), topped with fresh berries and powdered sugar. For more inspiration on French techniques, explore our guide to French Desserts.
Sustainability doesn’t have to be complicated. When you’re out exploring New York City’s dining scene, choose a waffle cone instead of a disposable cup—small choices add up. At home, compost fruit scraps from your waffle toppings and use reusable serving ware for your waffle bar setup. These simple steps make your waffle mastery kinder to the planet while still delivering incredible flavors.
Frequently Asked Questions About the Perfect Waffle Recipe
Let’s tackle the most common questions that come up during your waffle-making journey. These are the same questions we hear from home cooks all the time in our New York City culinary community.
What’s the difference between Belgian waffles and regular waffles?
The main difference comes down to deep grids versus shallow ones. Belgian waffles have those gorgeous, deep pockets that create perfect little pools for syrup and toppings. They’re also thicker and more pillowy inside.
Regular American waffles are thinner and crispier, with smaller, shallower squares. The cooking method differs too—Belgian waffles often use yeast or whipped egg whites for that signature airy texture, while regular waffles rely on baking powder for their lift.
Think of it this way: Belgian waffles are your weekend luxury breakfast, while regular waffles are your crispy, everyday favorite. Both have their place in a great waffle recipe collection.
How do I make waffles light and fluffy every time?
Here’s the game-changer: separate those eggs. Beat the whites until they form stiff peaks, then gently fold them into your batter right before cooking. This creates tiny air pockets that make your waffles incredibly light.
The key word here is gently. Don’t deflate those precious egg whites by stirring too vigorously. Think of it like folding laundry—slow, careful movements that preserve all that beautiful volume.
Room temperature eggs whip better than cold ones, so pull them out of the fridge about 30 minutes before you start cooking. Trust us, this simple technique will transform your waffle game completely.
Can I make waffles without a waffle iron?
You’re resourceful, we like that! While it’s possible, you’ll need to get creative. Some home cooks use a cast-iron grill pan that’s been well-greased and heated. You can also try silicone molds in the oven, though the results won’t be quite the same.
The truth is, you’ll get the delicious waffle flavor, but you’ll miss out on that signature crispy exterior and those perfect grid lines. The texture trade-offs are pretty significant—no crispy edges or syrup-catching pockets.
Our honest advice? A basic waffle iron is worth the investment. You’ll find yourself using it way more than you expect, especially once you master a few solid recipes. Plus, there’s something deeply satisfying about hearing that sizzle when the batter hits the hot plates.
Conclusion
Congratulations! You’ve just completed a journey that transforms ordinary mornings into extraordinary experiences. This 30-day waffle recipe challenge isn’t just about mastering batter and timing—it’s about building the confidence to create memorable moments around your breakfast table.
From your first tentative attempts at separating eggs to confidently whipping up Belgian-style masterpieces with deep, syrup-catching pockets, you’ve developed skills that will serve you for years to come. The beauty of waffle mastery lies in its versatility—whether you’re meal-prepping crispy cornstarch waffles for busy weekdays or setting up an elaborate waffle bar for weekend guests, you now have the knowledge to execute flawlessly.
What makes a great waffle recipe isn’t just the ingredients—it’s understanding how each component works together. You’ve learned that separating eggs creates lift, that cornstarch delivers crunch, and that proper cooling prevents sogginess. These aren’t just waffle tricks; they’re fundamental cooking principles you can apply across your entire culinary repertoire.
The global flavors and sustainable approaches we’ve explored connect your kitchen to food traditions worldwide. Every time you fold whipped egg whites into batter or experiment with Norwegian-inspired toppings, you’re participating in a rich culinary conversation that spans continents.

We’d love to celebrate your waffle victories with you! Share your creations, your favorite flavor combinations, and those happy breakfast moments with The Dining Destination community. Food is meant to be shared, and your experiences inspire other home cooks to start on their own culinary trips.
If you find yourself in New York City, bring this newfound confidence to explore our incredible brunch scene—you’ll appreciate the craft behind every golden waffle even more. For more inspiration beyond breakfast, find our comprehensive guide to French Desserts and continue expanding your culinary horizons.
Ready to tackle your own 30-day challenge? Let’s make every morning a destination breakfast, together.