Why Mastering Scones Will Transform Your Home Baking
Scones are tender, flaky quick breads that bridge the gap between sweet and savory – perfect for brunch, afternoon tea, or a grab-and-go breakfast. Here’s what you need to know:
Essential Scone Facts:
- What they are: Leavened pastries made with flour, butter, liquid, and baking powder
- Two main styles: British (biscuit-like, served with jam and cream) vs American (sweeter, triangular wedges)
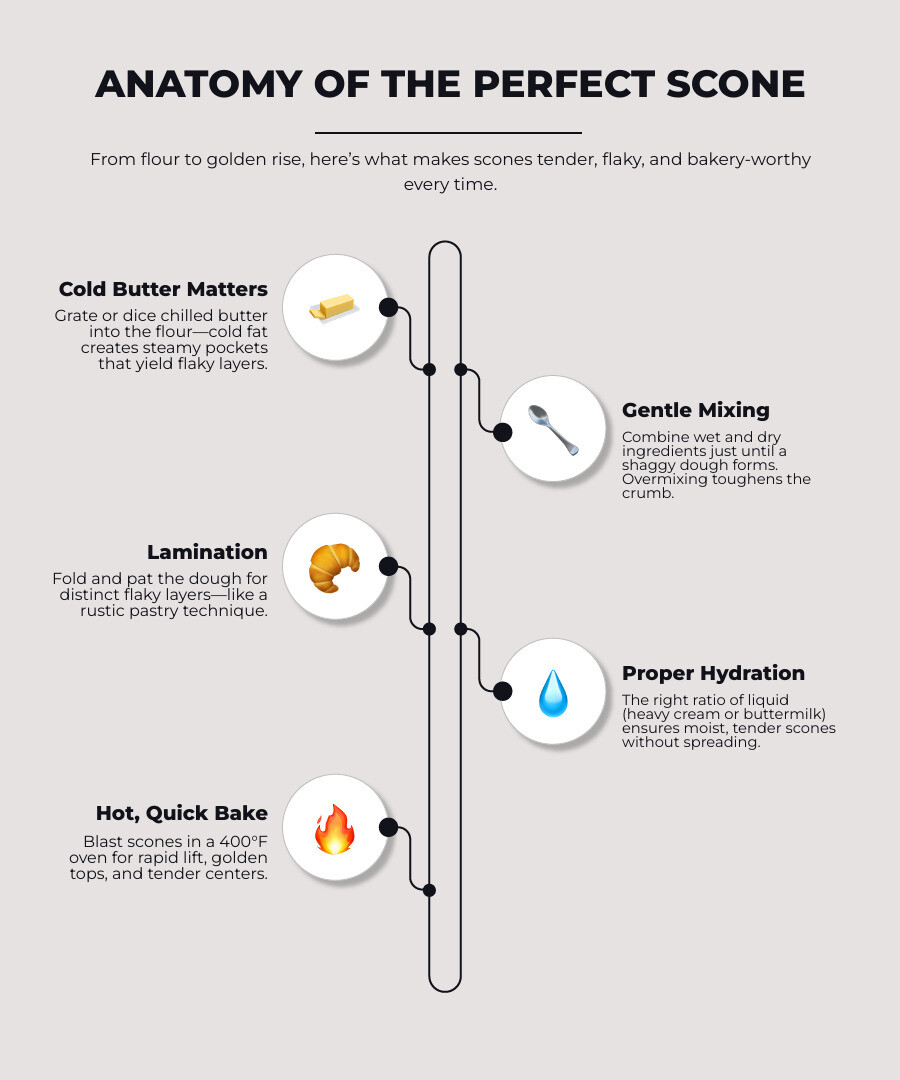
- Key technique: Cold butter creates steam pockets for flaky layers
- Baking basics: 400°F oven, 12-20 minutes until golden
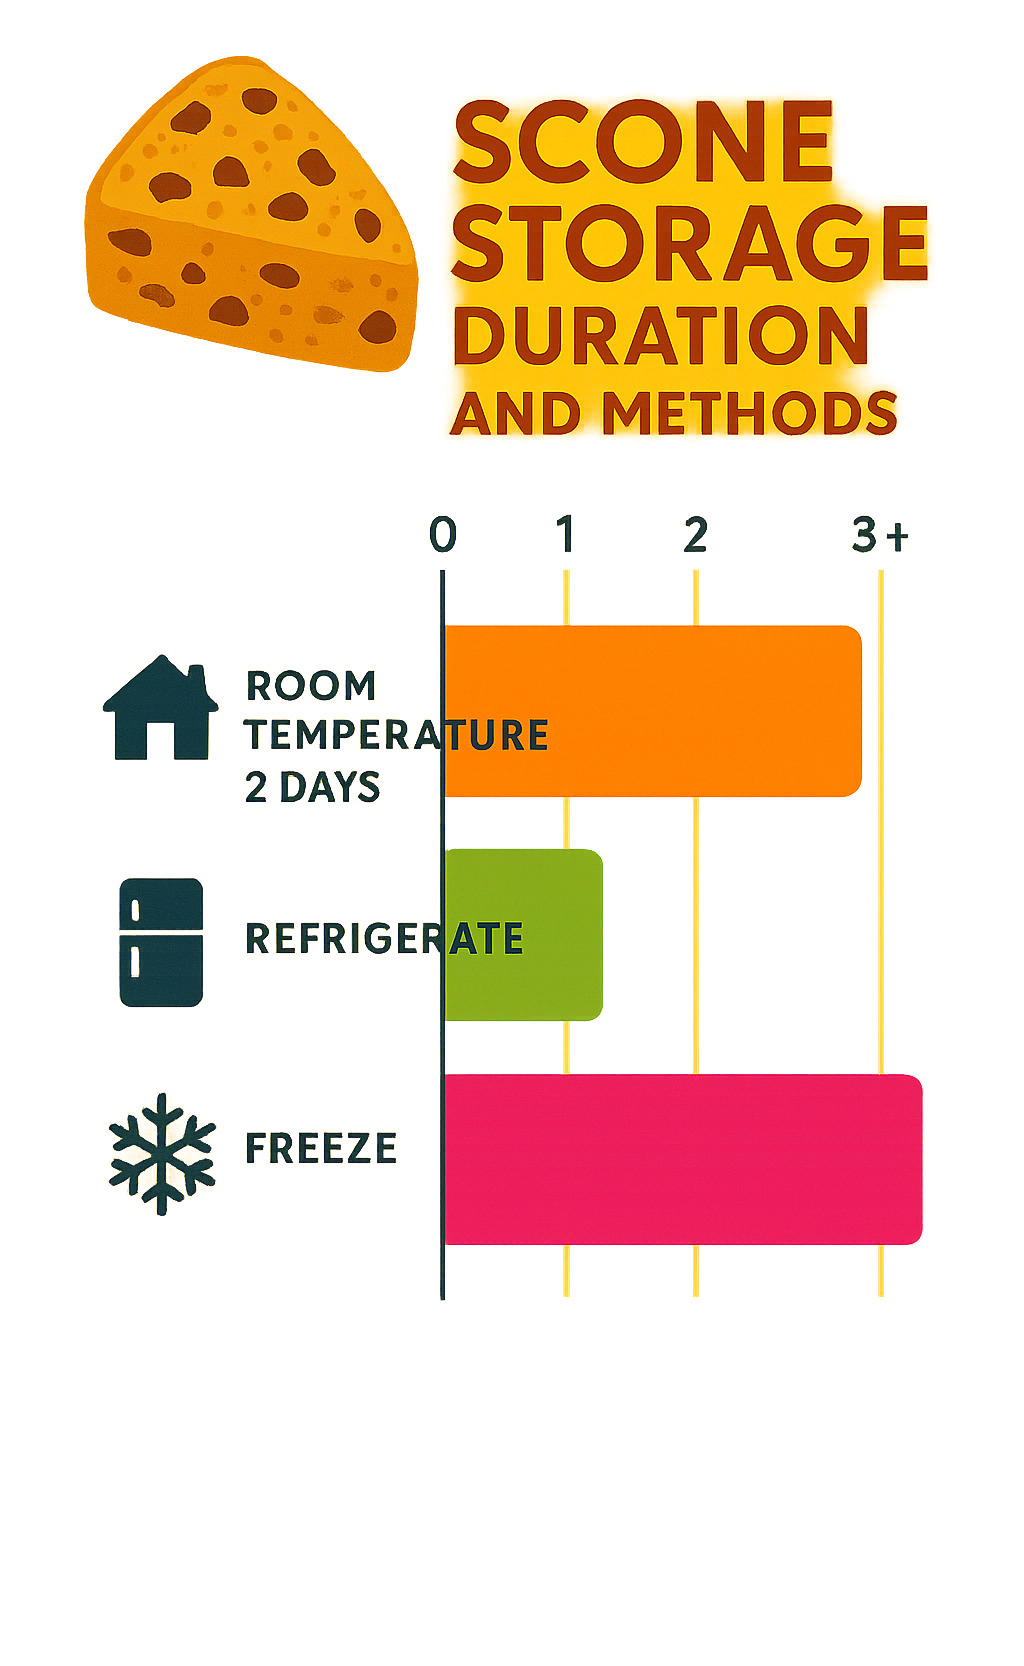
- Storage: 2 days at room temperature, 3 months frozen
Whether you’re craving buttery blueberry scones for Sunday brunch or savory cheddar-herb versions for dinner, the fundamentals remain the same. Cold ingredients, gentle handling, and proper technique separate dense, dry disappointments from bakery-quality results.
Many home bakers avoid scones because they’ve only tasted the “sandpapery” versions that give this pastry a bad reputation. But as one successful baker noted: “I now believe I have created the best scone recipe in the world!” – and with the right guidance, you can too.
The secret lies in understanding the science behind flaky layers, choosing the right liquid (heavy cream beats milk every time), and mastering simple techniques like frozen butter grating and dough lamination.
Key scones vocabulary:
Scones 101: British vs. American Styles
The humble scone has a long (and sometimes mysterious) history. Some say the name comes from the Scottish Gaelic “sgonn,” which means a shapeless mass or a good-sized mouthful—fitting, right? The first written mention pops up in a Scottish poem from 1513, but the real truth about their origin? Still hidden in the mists of the British Isles. There’s even a fanciful tale tying scones to the legendary Stone of Destiny, though most bakers chalk that one up to folklore.
Scones began as simple oat cakes, griddle-cooked over open fires in Scotland. Once the English got their hands (and butter) on them, scones evolved into the tender, golden pastries we love today. They quickly earned a starring role in 19th-century afternoon tea, thanks to Anna, Duchess of Bedford, who believed every cup of tea deserved a flaky companion.
How Do British “Scones” Differ from U.S. “Scones”?
Crossing the Atlantic transformed the scone into two deliciously different treats.
In Britain, scones are fluffy and light—almost identical to American biscuits. They’re not too sweet and usually come plain or with a few currants. British scones are always round, split in half, and enjoyed with clotted cream and jam (there’s an endless debate: cream first or jam first?). Even how you say their name depends on where you grew up: “skahn” up north in Scotland, “skoan” down south.
American scones, on the other hand, are a bit bolder. Here, they’re sweeter, denser, and cut into triangles. You’ll often find them loaded with chocolate chips, berries, or nuts, and sometimes drizzled with glaze or sprinkled with coarse sugar. A single wedge can pack anywhere from 247 to 397 calories—more if you’re feeling generous with the chocolate!
Food historians often say that American scones can turn out heavy and dry, but with the right approach (and a few bakery secrets), you can make melt-in-your-mouth scones at home.
Here’s a handy comparison:
| Feature | British Scones | American Scones |
|---|---|---|
| Texture | Light, fluffy | Dense, cake-like |
| Shape | Round | Triangular wedges |
| Sweetness | Not very sweet | Noticeably sweet |
| Add-ins | Rare, maybe currants | Frequent (berries, chocolate) |
| Serving | With clotted cream & jam | Often glazed or sugared |
Why Cold Butter Matters for Both Styles
Whether you love classic British scones or the American bakery-style, one secret is universal: cold butter is non-negotiable. When you bake scone dough dotted with frigid butter, those little bits melt fast in the oven, releasing steam and creating flaky layers—the signature scone texture everyone craves. As nutrition research confirms, “Cold butter creates flaky texture through steam release when water content evaporates in the oven.”
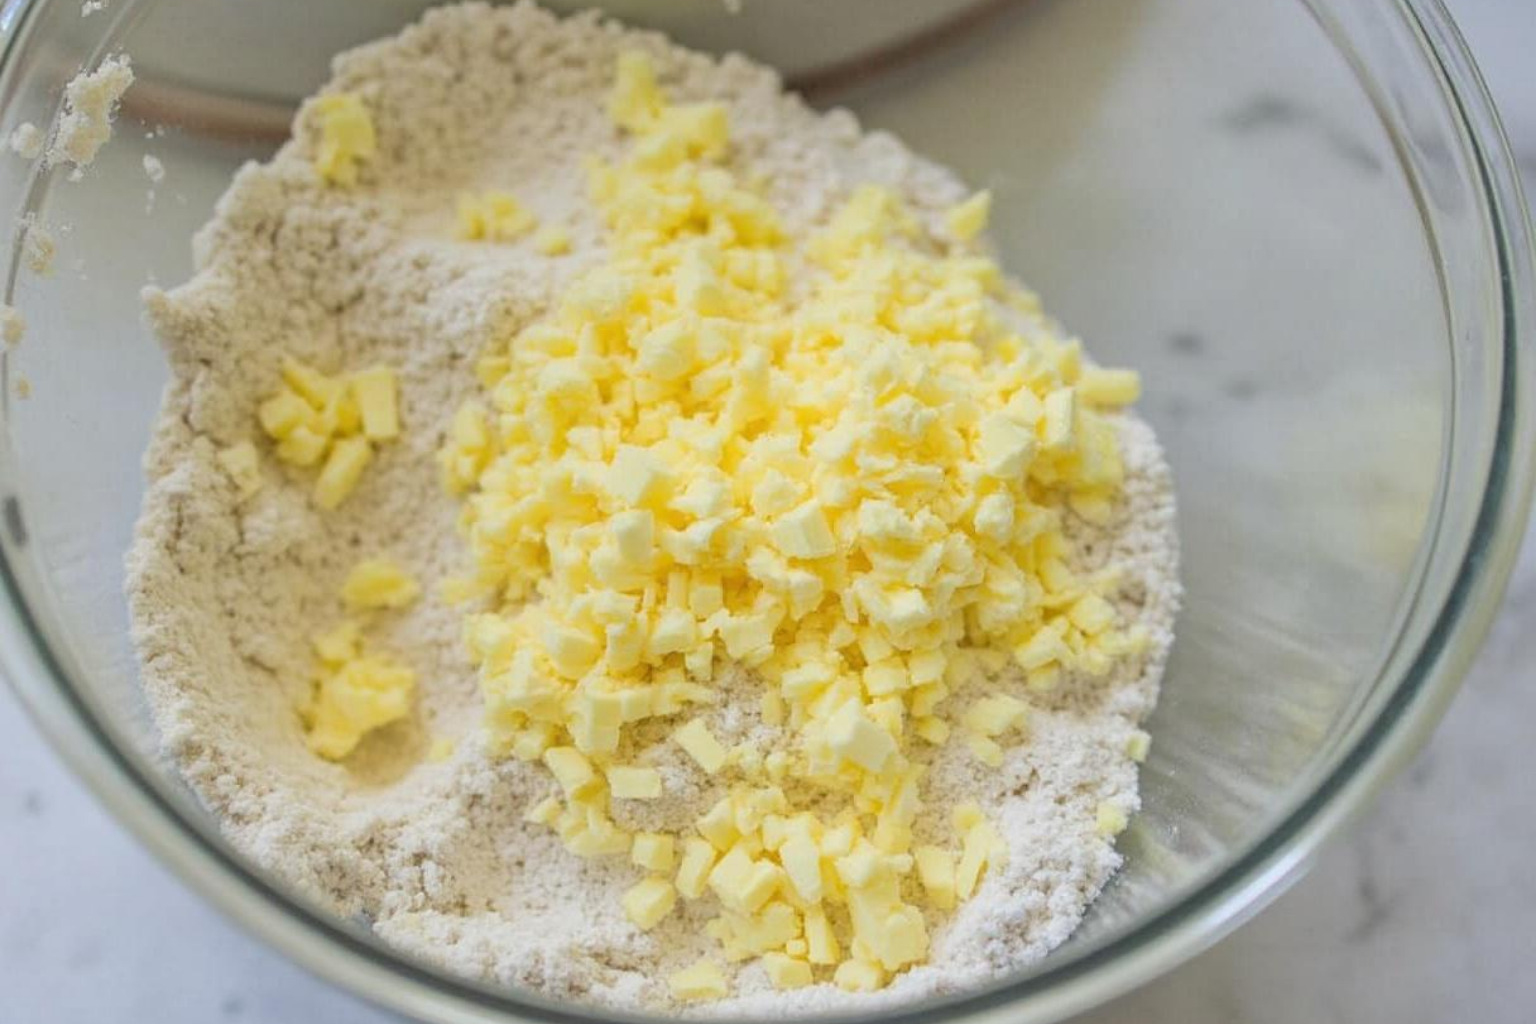
For the best results, grab a box grater and work with frozen butter. Grating it straight into your dry ingredients means tiny bits get evenly distributed, and your hands won’t warm them up. This simple trick makes a noticeable difference, whether you’re making rounds for a cream tea or triangles for a cozy brunch.
No matter which side of the ocean inspires your next batch, understanding these basics will set you up for scone success—flaky, golden, and ready for any jam, glaze, or pat of butter you can dream up.
Essential Ingredients & The Science of Flaky Scones
Master bakers know that scones succeed or fail based on ingredient quality and ratios. Let’s break down the essentials:
Core Ingredients:
- All-purpose flour (270g/2¼ cups): Provides structure without excessive gluten development
- Baking powder (2-3 teaspoons): Creates lift and tender crumb
- Cold unsalted butter (5-6 tablespoons): Fat creates flakiness and flavor
- Heavy cream or buttermilk (¾ cup): Liquid binds ingredients and adds richness
- Granulated sugar (2-4 tablespoons): Sweetness varies by style
- Salt (½ teaspoon): Improves flavor and strengthens gluten structure
- Egg (1 large): Adds richness and helps binding
The scientific research on nutrition database shows that proper ingredient ratios create the ideal hydration level for tender, not tough, results.
Choosing the Right Liquid: Heavy Cream vs. Buttermilk vs. Milk
This choice dramatically impacts your final product:
Heavy Cream (36% fat):
- Creates the richest, most tender scones
- Higher fat content produces superior flakiness
- Neutral flavor lets mix-ins shine
- Our top recommendation for beginners
Buttermilk:
- Acidity reacts with baking powder for extra lift
- Tenderizes dough and adds tangy depth
- Traditional choice for many heritage recipes
- Excellent for savory variations
Regular Milk:
- Thinner consistency may require flour adjustments
- Less fat means less tender results
- Acceptable substitute but not ideal
- Half-and-half works better than skim
As one expert baker explains: “Buttermilk is the preferred liquid for scones because its acidity reacts with baking powder and tenderizes the dough, resulting in tender, taller scones with lovely tang.”
Mix-Ins That Work (and How Much to Add)
The beauty of scones lies in their versatility. Research shows they’re “one of the most customizable baked goods” with endless possibilities:
Sweet Options (¾ to 1 cup maximum):
- Fresh berries: blueberries, raspberries, blackberries
- Dried fruits: cranberries, raisins, currants, chopped dates
- Chocolate: chips, chunks, or mini morsels
- Nuts: chopped pecans, walnuts, or almonds
- Citrus zest: lemon, orange, or lime
Savory Combinations:
- Cheddar cheese and fresh chives
- Goat cheese and herbs
- Sun-dried tomatoes and basil
- Everything bagel seasoning
Critical tip: Limit fresh fruit to 1 cup total to avoid overly moist dough. Frozen berries work well but may stain the dough slightly. For wet ingredients like fresh berries, add an extra 1-2 tablespoons of flour to compensate.
Step-by-Step Process: From Mixing to Perfectly Baked Scones
Ready to bring bakery-worthy scones to your kitchen? Let’s walk through the process—one that combines classic wisdom with modern shortcuts for flaky, tender results every time.
First, start with mise en place—this simply means getting everything in order before you dive in. Preheat your oven to 400°F (204°C) and line a baking sheet with parchment paper. Pop your butter in the freezer for at least an hour; trust me, this move is the key to those steamy, flaky layers. Measure each ingredient precisely—scones are forgiving, but accuracy helps every baker.
Next, it’s time to make the dough. In a big bowl, whisk together your dry ingredients: flour, sugar, baking powder, and salt. Take your frozen butter and grate it right into the flour using the large holes of a box grater (it’s oddly satisfying!). Quickly rub the butter into the flour using your fingertips or a pastry cutter, aiming for a texture like coarse meal with small, pea-sized bits of butter throughout. If you’re adding any mix-ins—chocolate chips, berries, herbs—toss them in now so they get a light coat of flour and don’t sink to the bottom.
In a separate bowl, whisk together your wet ingredients: cream (or buttermilk), egg, and a splash of vanilla if you like. Pour the wet over the dry and gently stir with a fork or spatula until a shaggy dough forms—don’t overmix, or your scones may end up tough.
Now for the magic: shaping and lamination. Turn the dough onto a floured surface and gently knead it 5 or 6 times, just enough to bring it together. For extra flakiness, pat the dough into a rectangle, fold it into thirds like a letter, turn it 90 degrees, and repeat the fold just once more. This simple lamination step gives you those swoon-worthy layers.
Shape your dough into a round disc, about 7-8 inches across and 1 inch thick. Using a sharp knife or bench scraper, cut it into 8 even wedges.
Before baking, arrange your wedges on the prepared sheet, letting them just kiss each other—this helps them rise nice and tall. Brush the tops with a little extra cream or buttermilk and sprinkle with coarse sugar for a crunchy, bakery-style finish. Pop the tray in the fridge to chill for at least 15 minutes; cold dough means your scones will keep their shape and rise to fluffy heights in the oven.
Shaping & Cutting Scone Dough Like a Pro
How you shape your scones isn’t just about looks—it truly affects the texture and crumb. The classic approach is to pat your dough into an even disc and cut straight down into wedges (avoid sawing, which can seal edges and stop a good rise). For drop scones, scoop rough portions with an ice cream scoop straight onto your baking sheet for a rustic, easy vibe—great for wetter, chunkier doughs. Prefer the British touch? Use a floured biscuit cutter for neat, round scones, gently rerolling scraps as needed.
A pro tip for all shapes: arrange your scones so the sides are just touching. This helps them rise evenly and keeps the sides soft and tender.
Scones in the Oven—Temperature, Timing & Visual Cues
Now, let’s get baking! Most scones thrive at 400°F (204°C), but if you’re using convection, dial it down to 375°F. Standard wedges usually bake for 12–20 minutes; larger or round scones may need a few minutes more.
Doneness is all about the look and touch: you want golden brown tops and edges, a slightly puffed appearance, and scones that feel set but not hard when you gently press the center. If you have a kitchen thermometer, the inside should read around 200°F—no more gummy centers.
Watch out for classic mistakes! Don’t open the oven door too often (it can cause collapse), and be careful not to overbake—this leads to dry, crumbly scones. Underbaking leaves them gummy and dense inside.
With a little patience and the right know-how, you’ll pull perfect, golden scones from your oven—ready to enjoy with tea, jam, or just on their own. For more food inspiration and travel-worthy bites, explore our guides and articles at The Dining Destination.
Flavor Variations, Savory Twists & Creative Toppings

Once you’ve nailed the basics, scones open up a whole world of flavor possibilities—think of it as the ultimate playground for home bakers. In our New York City test kitchen, we’ve tried every combination under the sun, and some have become clear favorites.
For sweet lovers, you can’t go wrong with lemon blueberry (just a bit of lemon zest and a handful of blueberries brighten up any morning) or a cranberry orange that gets its zing from orange zest and a splash of juice. Classic chocolate chunk scones, made with good-quality dark chocolate, turn out decadent and rich. When fall hits, swap in pumpkin puree and a sprinkle of pumpkin pie spice for a cozy treat.
But scones aren’t just about the sweet side. Savory twists like cheddar chive (with sharp cheese and fresh green chives) or goat cheese herb (add a little thyme or rosemary) make them perfect for brunch, lunch, or even an afternoon snack. Feeling bold? Mix in some everything bagel seasoning for a modern New York spin, or try sun-dried tomatoes with basil for a Mediterranean flair.
Toppings add that final touch. A simple glaze of powdered sugar and milk works wonders on sweet scones, while a sprinkle of coarse sugar gives sparkle and crunch. For a deep golden color, brush the tops with an egg wash before baking. If you’re making chocolate scones, a pinch of flaky sea salt on top is a game changer.
The real trick is to let your mix-ins shine. Too many flavors can overwhelm—sometimes, less is more. As research shows, “fancy scones with dried fruit, nuts or chocolate morsels are best enjoyed without butter and jam,” so you can truly taste those special additions.
Scones for Every Season—Fresh vs. Frozen Fruit Tips
At The Dining Destination, we love adapting scones to the season. In spring, fresh strawberries and a simple vanilla glaze add brightness. Summer is all about juicy blueberries and peaches, while fall calls for tender apple cinnamon or pumpkin spice. Winter? Cranberry orange and chocolate always have a place at the table.
If you’re using fresh fruit, pick firm—not overripe—pieces to avoid mushy scones. Toss fruit with a little flour before mixing in to keep it from sinking, and remember to reduce the liquid in your dough just a bit to make up for extra moisture. Expect some color bleeding from berries—it’s all part of the charm.
Frozen fruit makes scone baking possible any time of year. Don’t thaw before baking; just add frozen berries straight to the flour. They’ll keep their shape and won’t bleed as much. Plus, frozen fruit often brings an extra punch of flavor.
Once you find your favorite combinations and toppings, the possibilities for scones are endless. Experiment, enjoy the process, and remember—whatever flavors you choose, a freshly baked scone is always worth sharing.
Storage, Freezing, Reheating & Make-Ahead Tips
Here’s the beautiful thing about scones – they’re incredibly forgiving when it comes to storage and make-ahead preparation. Whether you’re meal prepping for busy weekday mornings or planning ahead for weekend brunch guests, these storage techniques will keep your homemade scones tasting bakery-fresh.
Fresh-baked scones taste amazing, but they don’t have to be enjoyed immediately. At room temperature, store your cooled scones in airtight containers where they’ll maintain their tender texture for up to 2 days. The key word here is “airtight” – exposure to air will make them stale quickly. Resist the urge to refrigerate unless absolutely necessary, as this actually speeds up the staling process rather than preventing it.
Freezing baked scones opens up a world of convenience. Start by flash-freezing your completely cooled scones on baking sheets for about 2 hours. This prevents them from sticking together when stored. Transfer the frozen scones to freezer bags, squeeze out excess air, and they’ll keep beautifully for up to 3 months. When you’re ready to enjoy them, simply thaw at room temperature or warm them in a 300°F oven.
The real game-changer? Freezing unbaked dough wedges. Cut your shaped scones and freeze them on parchment-lined sheets, then transfer to freezer bags once solid. These frozen beauties can go straight from freezer to oven – just add 2-3 extra minutes to the baking time. Brush with cream and sprinkle with coarse sugar right before baking for that perfect golden finish.
When it comes to reheating, your toaster oven becomes your best friend. Split day-old scones and toast for 2-3 minutes to restore that crispy exterior. For whole scones, wrap them in foil and warm at 300°F for 5-8 minutes. In a pinch, the microwave works for 15-20 seconds, though the texture won’t be quite as perfect.
These storage techniques mean you can always have homemade scones ready for impromptu gatherings or solo indulgences. Speaking of gatherings, if you’re planning culinary trips beyond your kitchen, explore our guide to interesting places to eat for inspiration on incorporating your baking skills into memorable dining experiences.
Troubleshooting & Dietary Alternatives
Even the most experienced home bakers run into challenges with scones from time to time. But don’t worry—most issues have quick fixes, and with a little know-how, you’ll turn “flop” into “fantastic” in no time.

Are your scones coming out flat or spreading all over the pan? That’s almost always a sign your butter wasn’t cold enough or the dough didn’t chill long enough. Try grating frozen butter right into your flour and pop those shaped scones in the fridge for at least 15 minutes before baking. If they’re still not rising, check that your baking powder isn’t past its prime—a sneaky culprit for flat bakes.
Scones that taste dense or heavy can be disappointing, but the fix is simple: mix your dough just until it comes together and avoid adding too much flour. You want a rough, shaggy dough, not a workout for your arms. Also, double-check you’re using enough cold butter—that’s where the magic flakiness comes from.
If your scones turn out dry or crumbly, you might be baking them too long or skimping on liquid. Keep an eye on the oven, and make sure you’re measuring both flour and cream or buttermilk carefully (a kitchen scale helps). Scones are done when they’re lightly golden and just firm to the touch—not rock solid.
For scones that don’t rise tall and proud, gentle handling is key. Overworking the dough can knock out all the air. Also, be sure your oven temperature is accurate—an inexpensive oven thermometer is a baker’s secret weapon!
And what if you or your guests have special dietary needs? Great news: scones are one of the most adaptable baked goods. For gluten-free scones, a 1:1 gluten-free flour blend (the kind labeled “measure-for-measure”) works wonderfully—just keep an eye on dough texture, as you might need a splash more liquid. Dairy-free bakers can swap in cold vegan butter and canned coconut milk, which gives a rich, tender crumb. For fully vegan scones, use a flax “egg” or commercial egg replacer, and plant-based butter and milk. The texture might be a touch denser, but the flavor still shines.
Baking at high altitude? No problem. Simply reduce baking powder a bit, bump up your liquid by a tablespoon or two, and try baking at 375°F instead of 400°F. Minor tweaks, major payoff!
Every oven—and every batch of scones—is a little different. So if you hit a snag, don’t get discouraged. With these troubleshooting tips, you’ll be well on your way to bakery-worthy scones every time.
Looking for more inspiration or want to see how scones fit into unique food experiences? Explore The Dining Destination for more culinary ideas and guides from our New York City kitchen!
Frequently Asked Questions about Scones
What liquid is best—heavy cream, buttermilk, or milk?
When it comes to scones, your liquid choice makes all the difference between bakery-quality results and disappointing dense bricks. Heavy cream takes the crown here – its rich 36% fat content creates the most tender, flaky texture you’re after. The extra fat doesn’t just add richness; it actually helps create those coveted steam pockets that make scones light and airy.
Buttermilk comes in as our strong second choice, and for good reason. Its natural acidity works like magic with baking powder, creating extra lift that makes your scones rise beautifully. Plus, that subtle tangy flavor adds depth that complements everything from sweet blueberry scones to savory cheddar-herb varieties.
Regular milk? It’ll work if that’s what you have, but expect less impressive results. The lower fat content means less tender scones overall. If you’re stuck with milk, try using half-and-half instead – it’s a nice middle ground that gives you better fat content without the full richness of cream.
For our dairy-free friends, canned coconut milk (the full-fat kind) comes closest to replicating heavy cream’s magic. It’s got the fat content and richness that makes scones sing.
Can I freeze scone dough before baking?
Here’s a secret that even surprises experienced bakers: freezing unbaked scone dough often produces better results than baking fresh dough right away. The reason? That butter stays ice-cold longer, creating even more dramatic steam pockets when it hits the hot oven.
The process couldn’t be simpler. After cutting your scones into wedges, arrange them on a parchment-lined baking sheet and pop them in the freezer for 1-2 hours until they’re solid. Then transfer them to freezer bags where they’ll keep beautifully for up to 3 months.
When you’re ready for fresh scones, there’s no thawing required. Just brush those frozen wedges with cream, sprinkle with coarse sugar, and slide them into your 400°F oven. They’ll need just 2-3 extra minutes compared to fresh dough, but the results are often even more impressive than the original batch.
This method is perfect for meal prep or when you want to surprise guests with warm scones without the morning mixing fuss.
How do I know when my scones are fully baked?
Perfect scones will tell you when they’re ready through several clear signals. First, look for that beautiful golden brown color on both tops and edges – this indicates proper browning and flavor development. Your scones should also have a slightly puffed appearance, showing that the leavening did its job.
The touch test is equally important. Gently press the top of a scone – it should feel firm and spring back slightly, not squishy or raw. If you’re a numbers person, an instant-read thermometer should show an internal temperature of 200°F.
Here’s the hardest part: resist opening that oven door for the first 12 minutes of baking. Opening it too early can cause your scones to collapse, undoing all your careful work with cold butter and proper technique.
If you notice the tops browning too quickly while the centers still seem underdone, simply tent them with foil and continue baking for a few more minutes. This prevents over-browning while ensuring the interiors cook through completely.
The reward for patience? Scones with golden exteriors, tender flaky interiors, and that perfect balance of textures that makes homemade so much better than store-bought.
Conclusion & Next Steps
Mastering scones is a game-changer for any home baker. Suddenly, your kitchen transforms into the best bakery in town—whether you’re serving up a tray for brunch with friends in New York City or sneaking a warm wedge for yourself with a cup of tea. The steps might seem simple, but with a little patience (and a lot of cold butter), you’ll find yourself baking scones that are flaky, tender, and bursting with personality every time.
The real secrets are straightforward: keep your ingredients cold, use a gentle hand when mixing and shaping, and don’t hesitate to play with flavors. Every batch is a chance to find a new favorite—maybe a zesty lemon-blueberry combo, a savory cheddar-chive twist, or even something uniquely your own. The beauty of scones is just how adaptable they are; they fit right in at a fancy tea table or next to your morning coffee on a quiet day.
We’d truly love to see what you create! Try out the techniques you’ve learned, snap a photo of your own scones, and share your delicious results with us. As you continue your baking journey, don’t forget that the world is full of inspiration. Curious to see how professional chefs and bakeries are reinventing classic pastries? Explore our handpicked guide to the best unique restaurants—you might just find your next baking muse.
From everyone at The Dining Destination, happy baking! And remember: every great baker started as a beginner, with flour on their hands and hope in their heart. Keep practicing, keep tasting, and soon, you’ll serve up scones with the confidence of a seasoned pro.

