
Why Mastering the Perfect Over Easy Egg Will Transform Your Breakfast Game
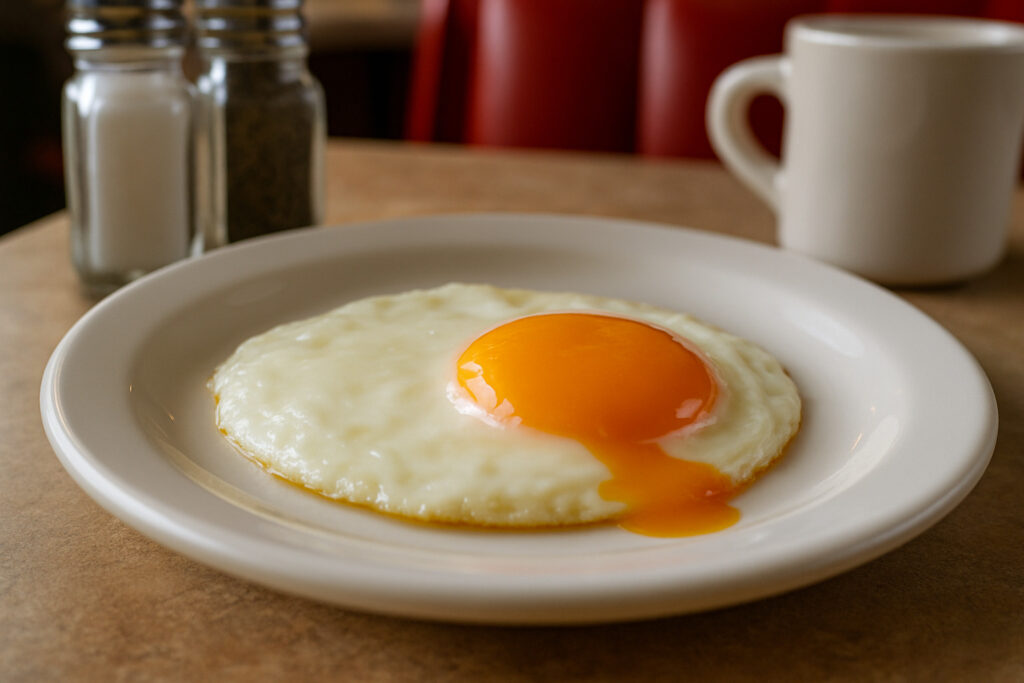
An over easy egg is a fried egg that’s cooked on both sides with set whites and a gloriously runny yolk – and it’s one of the most requested styles in American diners for good reason.
Quick Over Easy Egg Essentials:
- Definition: Fried egg flipped and cooked briefly on second side (30 seconds to 1 minute)
- Key Features: Firm, opaque whites + liquid, golden yolk
- Cook Time: 2-3 minutes first side, 30 seconds-1 minute second side
- Best Pan: 8-10 inch nonstick or well-seasoned cast iron
- Heat Level: Medium-low to prevent crispy edges
Here’s the thing about over easy eggs – despite having “easy” right in the name, they’re actually pretty tricky to nail consistently. As one home cook put it perfectly: “The goal for a perfectly cooked over easy egg is to have a firm egg white and a runny yolk.”
That runny yolk acts like nature’s perfect sauce, making over easy eggs the top choice for breakfast sandwiches and toast dipping. But getting those whites fully set while keeping that yolk intact during the flip? That takes some serious technique.
The difference between over easy eggs and their cousins is all about timing and flipping. Unlike sunny side up eggs (never flipped), over easy eggs get a quick flip to cook both sides. They’re less messy than sunny side up but more delicate than over medium or over hard varieties.
Whether you’re cooking for yourself or feeding a crowd, mastering this fundamental breakfast skill will seriously upgrade your morning routine. Plus, at just 99-122 calories per egg with 6 grams of protein, they’re as nutritious as they are delicious.

Glossary for over easy egg:
Mastering the Over Easy Egg: Equipment & Ingredients
The secret to consistently perfect over easy eggs isn’t just technique – it’s having the right tools and ingredients ready to go. After countless mornings in our New York City test kitchen (and yes, plenty of broken yolks along the way), we’ve figured out exactly what you need to nail this breakfast classic every single time.
Think of it this way: you wouldn’t try to paint a masterpiece with a house brush, right? The same logic applies to Over Easy Eggs. When you set yourself up with quality equipment and fresh ingredients, you’re already halfway to breakfast perfection.
Here’s something fascinating – Scientific research on egg nutrition shows that eggs contain all nine essential amino acids plus vitamins A, D, E, and B12. That’s some serious nutritional power packed into one little shell! All the more reason to treat your eggs with the respect they deserve.
Over Easy Egg-Friendly Cookware
Your pan is absolutely everything when it comes to over easy egg success. We’ve tested everything from bargain nonstick skillets to heirloom cast iron, and here’s what actually works.
Size matters more than you think. An 8-inch pan is your sweet spot for cooking one to two eggs. Any smaller and you’ll be wrestling with your spatula during the flip. Any larger and your butter spreads too thin, leaving you with sticky spots that’ll grab your delicate egg whites.
Now, let’s talk about pan types – because each one has its personality. Nonstick skillets are honestly our top recommendation for beginners. They’re forgiving, require minimal fat, and make that crucial flip almost foolproof. Just make sure yours doesn’t have any scratches or chips.
Cast iron is where things get interesting. A well-seasoned cast iron pan holds heat beautifully and gives you those gorgeous, restaurant-quality results. The learning curve is steeper, but once you get the hang of it, you’ll never want to go back.
Stainless steel can work, but it’s definitely the trickiest option. You’ll need to preheat it properly until water droplets dance across the surface, then use about two teaspoons of oil per egg to prevent sticking.
Here’s the game-changer most people overlook: your spatula. You need something thin enough to slide completely under the egg without catching the yolk, but wide enough to support the entire egg during the flip. A thin spatula with a beveled edge – whether silicone or metal – is absolutely non-negotiable.

Over Easy Egg Pantry Checklist
Let’s talk about the supporting cast that makes your over easy eggs truly shine. These aren’t just ingredients – they’re your secret weapons for breakfast perfection.
Unsalted butter is our absolute favorite fat for cooking eggs. It creates that gorgeous golden color and adds a rich, nutty flavor that just can’t be beat. Plus, when you control the salt separately, you can season exactly to your taste.
If you’re after crispy edges instead of buttery richness, reach for a neutral oil like vegetable or canola. It won’t add flavor, but it handles higher heat without browning.
Want to know our secret weapon? Bacon fat. If you’ve got some reserved from breakfast prep, this liquid gold prevents sticking better than anything else and adds incredible savory depth to your eggs.
For seasoning, keep it simple with kosher salt and freshly ground black pepper. Kosher salt is much easier to control than table salt, and you won’t accidentally oversalt your eggs. Add the pepper after flipping to prevent it from burning and turning bitter.
The star of the show, of course, is your fresh large eggs. Look for bright orange yolks – they’re not just prettier, they indicate better nutrition and richer flavor. Farm-fresh eggs will hold their shape better than store-bought, but either way, make sure they’re as fresh as possible.
One final tip: keep everything within arm’s reach before you start cooking. Over easy eggs happen fast, and there’s no time to hunt around for your salt once that egg hits the pan.
5 Easy Steps to Skyrocket Your Over Easy Egg Skills
Ready to master the over easy egg? We’ve broken down the process into five foolproof steps that will have you flipping like a pro. This technique has been perfected through countless breakfast experiments in our New York City test kitchen, and it works every single time when you follow the timing just right.
The secret to success lies in understanding exactly how over easy eggs differ from their breakfast cousins. While sunny side up eggs never get flipped, and over medium eggs cook longer on the second side, the over easy egg hits that perfect sweet spot with just 30 seconds to 1 minute on the flip side.
| Egg Style | Flip? | First Side | Second Side | Yolk Texture |
|---|---|---|---|---|
| Sunny Side Up | No | 2.5-3.5 min | N/A | Completely liquid |
| Over Easy | Yes | 2-3 min | 30 sec-1 min | Runny |
| Over Medium | Yes | 2-3 min | 1-2 min | Jammy |
| Over Hard | Yes | 2-3 min | 3-5 min | Firm |
Step 1 starts with proper preheating – and this is where most people rush things. Heat your pan over medium-low heat for a full 2-3 minutes. Think of it as setting about 2.5-3 on a 1-10 stove dial. The pan should feel warm when you hover your hand above it, but definitely not smoking.
Step 2 is all about the fat and the crack-in-bowl trick that changes everything. Melt 1 tablespoon of butter until it’s gently bubbling but hasn’t turned brown yet. Here’s the game-changer: crack your fresh large eggs into a small bowl first, then pour them slowly into the pan. This simple step prevents those heartbreaking yolk breaks and gives you complete control over placement.
Step 3 requires patience and keen observation. Season immediately with kosher salt – don’t wait or you’ll forget! Cook undisturbed for 2-3 minutes until you can see about ½ inch of unset whites around each yolk. The edges should look completely opaque and set, which is your visual cue that it’s almost flip time.
Step 4 brings us to the critical flip – the moment that separates the pros from the beginners. This deserves its own detailed breakdown, which we’ll cover in the next section, but the key is one smooth, confident motion with your thin spatula positioned completely under the egg.
Step 5 finishes strong on the second side. Cook for just 30 seconds to 1 minute depending on how runny you want that golden yolk. Add black pepper now to prevent burning, then slide your perfect over easy egg onto the plate immediately.
The timing precision here reminds us of baking – and if you’re looking to expand your kitchen measurement skills, our guide on How Many Tablespoons in a Cup? is surprisingly helpful for scaling any recipe!
Step 3 – Flip Your Over Easy Egg Like a Pro
The flip is where over easy egg dreams either soar or crash spectacularly into scrambled reality. We’ve perfected this technique through more broken yolks than we care to admit, and here’s exactly how to nail it every single time.
Your spatula placement makes all the difference. Position your thin spatula at the edge of the egg white – never start near the delicate yolk. The spatula should slide under the entire egg without any resistance, which means your pan is properly seasoned and your timing is spot-on.
The wrist action is pure technique, not strength. Slide the spatula completely under the egg, getting it centered beneath that precious yolk. Lift the egg about 2 inches above the pan – any higher and you’re asking for trouble. Use a quick but gentle wrist flick to turn the egg over, like flipping a delicate pancake with confidence.
Yolk protection is your top priority during this crucial moment. Move with purpose but not aggression. If you’re feeling nervous, try using two spatulas – one to flip, one to guide the landing. Keep the spatula close to the pan surface to minimize the drop distance, and let the egg settle gently without pressing down.
There’s also the steam-lid hack for those not quite ready for the flip challenge. Add 1-3 tablespoons of water to the pan, cover with a clear lid, and steam for about 30 seconds. This cooks the top without flipping, though purists will argue it’s not a true over easy egg.
Practice Makes Perfect Over Easy Egg
Mastering the over easy egg is like learning to ride a bike – it takes practice, but once you’ve got it, you’ve got it for life. Here’s how we recommend building your skills without wasting a dozen eggs in the process.
Single-egg batches are your friend when starting out. Don’t get ambitious and attempt multiple eggs until you’ve absolutely nailed the technique with one. It’s so much easier to control heat, timing, and that crucial flip when you’re focused on just one perfect over easy egg.
Heat control drills will save you from countless breakfast disasters. Practice recognizing when your pan hits that perfect medium-low temperature. Too hot and you’ll end up with crispy, brown edges that taste bitter. Too cool and those whites will never set properly, leaving you with a runny mess.
The low-and-slow mantra applies perfectly here. Rushing the process with high heat might seem efficient, but it’s the fastest way to ruin a perfectly good egg. Take your time, watch for those visual cues, and trust the process.
Start timing yourself once you get comfortable with the technique. First side should take 2-3 minutes, second side just 30 seconds for that perfect runny yolk. With practice, you’ll develop an internal clock that knows exactly when each stage is ready.

Troubleshooting, Mistakes, and Pro Tips
Let’s be honest – even the most experienced home cooks have their over easy egg disasters. We’ve seen it all in our New York City test kitchen: broken yolks, rubber-soled eggs, and pans that seem to grab onto eggs like they’re trying to keep them forever. The good news? Every mistake teaches you something valuable about perfecting your technique.
When your pan becomes an egg prison, it’s usually telling you something important. If your over easy egg sticks and tears during flipping, your pan likely needs more fat, lower heat, or better seasoning. This is especially true with stainless steel pans – they’re unforgiving but rewarding once you master them. For nonstick pans, check that the coating isn’t scratched or worn. A damaged nonstick surface is like trying to write with a broken pencil – technically possible but frustratingly difficult.
The dreaded broken yolk moment happens to everyone, usually right when you’re cooking for someone you want to impress. Here’s the thing – don’t panic and don’t throw it away! A broken yolk just means you’re making over medium or over hard eggs instead. They’re still absolutely delicious, just different. The key to preventing this heartbreak is using the bowl-cracking method we mentioned earlier and practicing that gentle flip technique until it becomes second nature.
Heat management separates the pros from the amateurs. When your eggs develop those crispy, brown edges that look like lace doilies, your heat is too high. The whites become rubbery and the butter starts to brown and taste bitter. If this happens mid-cook, immediately lower the heat and add a splash of water to cool things down. Remember our low-and-slow mantra – over easy eggs reward patience, not speed.
Overcrowding your pan is like trying to have a conversation in a crowded subway car – everything gets chaotic fast. Stick to one or two eggs per 8-10 inch pan. If you need more eggs, use multiple pans or cook in batches. Your eggs will thank you with better shape and easier flipping.
When butter starts browning before your eggs are ready, it’s time for a fresh start. Remove the pan from heat, wipe it clean with a paper towel, and begin again with fresh butter. This might seem wasteful, but burnt butter will make your eggs taste bitter and overshadow that perfect runny yolk you’ve worked so hard to achieve.
The steam-lid hack is your secret weapon when you’re not quite ready for the flip. Add one tablespoon of water to the pan and cover with a clear lid for about 30 seconds. This gently cooks the egg whites from above without requiring any flipping skills. It’s technically not a true over easy egg, but it’s a great confidence builder while you’re mastering the technique.
The most important lesson we’ve learned? Over easy eggs are about building confidence through repetition. Every broken yolk, every stuck egg, every slightly overcooked attempt is teaching your hands and eyes what perfect looks and feels like.
Looking for more ways to expand your cooking skills beyond breakfast? Our Easy Dinner Ideas collection will keep you experimenting in the kitchen all day long.
Serving Ideas, Storage & Nutrition Stats
The beauty of a perfect over easy egg lies not just in its golden, runny yolk, but in how versatile it becomes once you’ve mastered the technique. After countless breakfast experiments in our New York City test kitchen, we’ve finded some truly inspired ways to showcase this breakfast star.
Toast soldiers remain the ultimate classic – there’s something deeply satisfying about dipping strips of buttered toast into that liquid gold center. But don’t stop there! An over easy egg transforms any breakfast sandwich from ordinary to extraordinary, with that runny yolk acting as nature’s perfect sauce between bread layers.
Here’s where things get interesting: over easy eggs aren’t just for breakfast anymore. Drop one on top of a burger and watch it lift the entire dish. The warm, runny yolk creates an instant sauce that brings everything together beautifully.
For a lighter option, try placing an over easy egg over fresh salad greens. The contrast between the warm egg and cool greens creates an instant lunch that’s both satisfying and nutritious. And if you’re feeling adventurous, top your Fried Rice Recipe with a perfectly cooked over easy egg for that restaurant-style presentation that never fails to impress.
One of our favorite upgrades? Place an over easy egg on smashed avocado toast, then break that golden yolk for an Instagram-worthy breakfast that’s packed with healthy fats and complete protein. It’s simple, neat, and absolutely delicious.

Speaking of nutrition, over easy eggs are genuine nutritional powerhouses. At just 99-122 calories per egg (depending on your cooking fat choice), you’re getting 6 grams of complete protein – meaning all nine essential amino acids your body needs. The 8-11 grams of fat are mostly the healthy unsaturated kind, plus you’ll get important nutrients like vitamin D, B12, selenium, and choline.
Now, let’s talk storage reality. Honestly, over easy eggs are meant to be enjoyed immediately – that gorgeous runny yolk is the whole point, and it doesn’t play well with storage or reheating. But life happens, so if you absolutely must store them, keep them in the fridge for up to 2 days in a covered container.
For reheating, your best bet is a gentle 15-20 seconds in the microwave or a quick warm-up in a pan over low heat. Just make sure to reheat to 165°F for food safety. Fair warning though – the yolk won’t be quite the same liquid perfection you started with.
When you’re cooking for a crowd, resist the urge to cram multiple eggs into one large pan. Instead, use several 8-inch pans simultaneously. This gives you much better control over each egg’s doneness, and everyone gets to enjoy their over easy egg at its absolute best.
Frequently Asked Questions about the Over Easy Egg
What’s the visual cue to flip an over easy egg?
The magic moment for flipping your over easy egg is all about reading the whites. You’ll know it’s time when the egg whites are almost completely set and opaque, except for about ½ inch of slightly jiggly whites around each yolk. Think of it like a bullseye – the outer ring should be firm and white, while that inner circle stays a bit translucent.
Here’s the foolproof test: gently shake your pan. If the egg moves freely without sticking, you’re in the flip zone. The edges should look completely cooked through, and when you slide your spatula underneath, the egg should lift cleanly without any resistance.
Don’t rush this step! It’s better to wait an extra 30 seconds than to flip too early and end up with runny whites. The yolk will still be perfectly liquid even if the whites are fully set.
Can I cook multiple over easy eggs at once?
Absolutely, but there’s a sweet spot for success! We’ve found that 2 eggs maximum in an 8-10 inch pan gives you the best results. Any more than that and you’ll be juggling too many variables – uneven heat distribution, crowded flipping space, and different cooking times.
If you’re feeding a hungry crowd, your best bet is using multiple pans simultaneously rather than cramming everything into one giant skillet. Professional kitchens do this all the time, and there’s no shame in the home cook game!
Here’s a pro tip from our New York City test kitchen: keep your finished over easy eggs warm in a 200°F oven on a plate while you cook the next batch. This way everyone gets to eat hot eggs together instead of watching you flip eggs one by one.
The key is giving each egg enough space to cook evenly and flip safely. Trust us – patience beats speed every time when it comes to perfect runny yolks.
How do I keep eggs from sticking to stainless steel pans?
Stainless steel can be tricky for over easy eggs, but it’s totally doable with the right technique! The secret is all about proper preheating and enough fat – about 2 teaspoons of oil per egg, which is more than you’d use with nonstick.
Start by heating your empty stainless steel pan over medium-low heat. You’ll know it’s ready when a drop of water dances and sizzles across the surface instead of just sitting there. This usually takes 3-4 minutes of preheating.
Once your pan passes the water test, add your oil and let it heat for another 30 seconds before gently adding your eggs. The oil should shimmer but not smoke – if it’s smoking, your heat is too high.
The biggest mistake people make is adding eggs to a cold pan or not using enough fat. Stainless steel needs that barrier to prevent sticking, unlike nonstick surfaces that do the work for you.
Honestly though, if you’re just starting your over easy egg journey, nonstick or well-seasoned cast iron will be much more forgiving. Save the stainless steel technique for when you’ve mastered the basics!
Conclusion
There’s something deeply satisfying about cracking the perfect over easy egg – that moment when your spatula slides under effortlessly, the flip goes smoothly, and you’re rewarded with golden, runny yolk perfection. It’s one of those fundamental cooking skills that transforms your entire breakfast game.
From our test kitchen here at The Dining Destination in New York City, we’ve watched countless home cooks go from broken-yolk disasters to confident egg flippers. The secret isn’t magic – it’s understanding the basics we’ve covered: medium-low heat, proper timing with that crucial 2-3 minute first side and 30-second second side, and developing the confidence for that smooth flip with your thin spatula.
But here’s what makes mastering the over easy egg so worthwhile – that gorgeous runny yolk becomes nature’s perfect sauce for everything. Whether you’re dipping buttery toast soldiers, creating an Instagram-worthy avocado toast, or topping a burger, you’ve got instant flavor improvement that no bottle can match.
The patience and technique you develop making perfect over easy eggs will boost your overall cooking confidence too. You’ll find yourself more comfortable with heat control, timing, and those little kitchen moves that separate good cooks from great ones.
Ready to start your over easy egg journey? Head over to our complete guide at Over Easy Eggs for even more tips and techniques. And once you’ve mastered this breakfast classic, keep exploring new culinary trips with The Dining Destination – because great food experiences are always worth the trip!