
Why Manicotti is the Perfect Budget-Friendly Comfort Food
Manicotti is a large tube-shaped pasta that’s stuffed with cheese, baked in sauce, and beloved by families worldwide for its hearty, satisfying nature. This Italian-American comfort food classic can easily feed a crowd without breaking the bank.
What is Manicotti?
- Large ridged pasta tubes (the name means “big sleeves”)
- Typically stuffed with ricotta, mozzarella, and Parmesan cheese
- Often includes spinach or meat in the filling
- Baked in marinara or tomato sauce
- Serves 4-6 people for under $10 total cost
Key Benefits:
- Budget-friendly: Costs about $1.50 per serving vs $12-15 at restaurants
- Make-ahead friendly: Assemble today, bake tomorrow
- Freezer-friendly: Keeps for up to 3 months frozen
- Kid-approved: Hidden vegetables blend seamlessly into cheese filling
As one home cook shared in online reviews: “This is the first meal I ever cooked for my husband and all these years later, he still enjoys every bite.”
The beauty of manicotti lies in its versatility and affordability. Whether you’re planning a cozy family dinner or hosting friends, this dish delivers restaurant-quality satisfaction at a fraction of the cost. With just a few simple ingredients and smart shopping strategies, you can create a memorable meal that rivals any Italian restaurant experience.

Simple manicotti word guide:
Understanding the Magic of Manicotti
There’s something truly magical about manicotti – and it starts with the name itself. This beloved pasta gets its moniker from the Italian word “manica” meaning sleeve, combined with the suffix “-otto” to create “big sleeves.” Just picture those plump, ridged tubes waiting to be stuffed with creamy goodness.
While manicotti has deep Italian roots, it actually found its true calling in 20th-century Italian-American kitchens. Creative home cooks took inspiration from traditional Italian cannelloni but made it their own, creating something uniquely American while honoring old-world flavors.
Those distinctive ridges running along each tube aren’t just for looks – they catch and hold onto sauce, ensuring that each forkful delivers maximum flavor. It’s like the pasta was engineered for deliciousness.
| Pasta Type | Shape | Preparation | Origin | Best Filling |
|---|---|---|---|---|
| Manicotti | Ridged tubes, diagonal cut | Boil then stuff | Italian-American | Cheese-based |
| Cannelloni | Smooth tubes, flat ends | Roll fresh sheets | Italian | Meat or cheese |
| Stuffed Shells | Conch-shaped | Boil then stuff | Italian-American | Cheese-based |
Manicotti vs. Cannelloni: What Sets Them Apart?
Many people think manicotti and cannelloni are the same thing, but they’re actually cousins with distinct personalities. Cannelloni uses smooth pasta sheets rolled neatly around filling, creating tubes with flat, clean ends.
Manicotti uses pre-formed ridged tubes with pointed ends cut at diagonal angles, giving them a completely different look and texture. Those ridges grab onto every bit of sauce and cheese.
Traditional cannelloni often features hearty meat mixtures, while manicotti has always been the cheese lover’s dream. Ricotta, mozzarella, and Parmesan create that creamy, comforting base that American families adore.
Manicotti Filling Mistakes to Avoid
The watery ricotta trap gets almost everyone at least once. Fresh ricotta contains about 25% water, and all that moisture has to go somewhere when you bake. Always drain your ricotta on paper towels for at least 5 minutes before mixing.
Torn tubes are another heartbreaker. Never try to stuff hot pasta shells straight from boiling water – they’ll split instantly. Cool them in an ice bath first, then lay them out on clean kitchen towels to dry.
Salt overload happens when we forget that Parmesan and mozzarella are already salty ingredients. Always taste your filling mixture before adding more seasoning.
Finally, spinach moisture can sabotage even the most carefully planned meal. Frozen spinach needs to be squeezed completely dry in a clean kitchen towel. Fresh spinach should be blanched, shocked in ice water, and thoroughly dried.
Manicotti Ingredients on a Shoestring
Smart shopping is the secret to creating restaurant-quality manicotti without the restaurant price tag. When you break down the numbers, feeding a family of six costs around $8-10 total – that’s less than what most restaurants charge for a single serving!
The beauty of manicotti lies in its simplicity. You only need a handful of core ingredients: ricotta cheese, mozzarella, Parmesan, pasta tubes, and marinara sauce. Everything else is bonus flavor based on what’s on sale.
Your biggest expense will be the cheese, which typically runs about $7.50 for all three types. The pasta shells cost around $1.50, and marinara adds another $1.50. Add frozen spinach for 99 cents, and you’ve got a hearty meal that rivals any Italian restaurant.
Here’s where the magic happens: bulk buying and smart substitutions. Buying cheese in blocks instead of pre-shredded saves about 30% right off the bat. Shopping farmers markets near closing time often means discounted produce. Growing your own herbs on a windowsill turns expensive fresh basil into practically free flavor.
Ground beef or Italian sausage makes a wonderful addition when it’s on sale, but manicotti shines just as brightly as a vegetarian dish. For inspiration on finding quality ingredients affordably, check out Best Culinary Experiences for tips from fellow food enthusiasts.
Choosing the Right Pasta Type
Your pasta choice affects both your budget and your sanity level in the kitchen. Traditional manicotti tubes look the most authentic with their ridged exterior and diagonal cuts, but they can be tricky to stuff without tearing. They’ll run you about $1.50 per box.
No-boil lasagna sheets are a game-changer for beginners and budget-conscious cooks alike. At $1.25 per box, they’re slightly cheaper and infinitely more forgiving. You simply soak them in hot water for five minutes until pliable, cut them into 4-inch squares, and roll them around your filling.
Fresh pasta sheets deliver superior texture and are the easiest to work with, but they’ll cost you $3-4 per pound and have a shorter shelf life. If you’re new to making manicotti, save the fresh pasta for when you’ve mastered the technique.
For most home cooks, no-boil lasagna sheets offer the best balance of affordability, ease, and results.
Budget Cheese & Filling Hacks
Since cheese represents about 60% of your ingredient cost, this is where smart shopping makes the biggest difference. Part-skim ricotta costs less than whole milk ricotta and actually works better in baked dishes since it’s less likely to make your manicotti watery.
Want to stretch your ricotta even further? Mix it 50/50 with cottage cheese. The texture is nearly identical once baked, but your wallet will definitely notice the savings.
Mozzarella savings come from buying blocks and shredding yourself – it takes two minutes and saves about 30%. When provolone goes on sale, mix it with your mozzarella for added flavor complexity.
The real budget magic happens with your flavor boosters. A windowsill herb garden costs about $10 upfront but provides months of fresh basil, parsley, and oregano. Frozen spinach delivers the same nutrition as fresh at one-third the cost – just squeeze it completely dry before mixing it into your filling.
Step-by-Step Budget Manicotti Guide
Making perfect manicotti at home isn’t just about saving money – it’s about creating something truly special for your family. The key to success lies in good preparation and following a proven method.
Start by getting everything ready before you begin cooking. Preheat your oven to 350°F and gather all your ingredients on the counter. This prevents scrambling around later when your hands are covered in cheese filling.
While your oven heats up, place your ricotta cheese on paper towels to drain. This small step makes a huge difference in preventing watery manicotti later. Mix your filling ingredients in a large bowl, tasting as you go to adjust seasoning.
The foolproof assembly process starts with spreading a thin layer of sauce in your 9×13 baking dish. Fill each shell using either a piping bag or a zip-top bag with the corner snipped off – this makes the job much cleaner and faster.
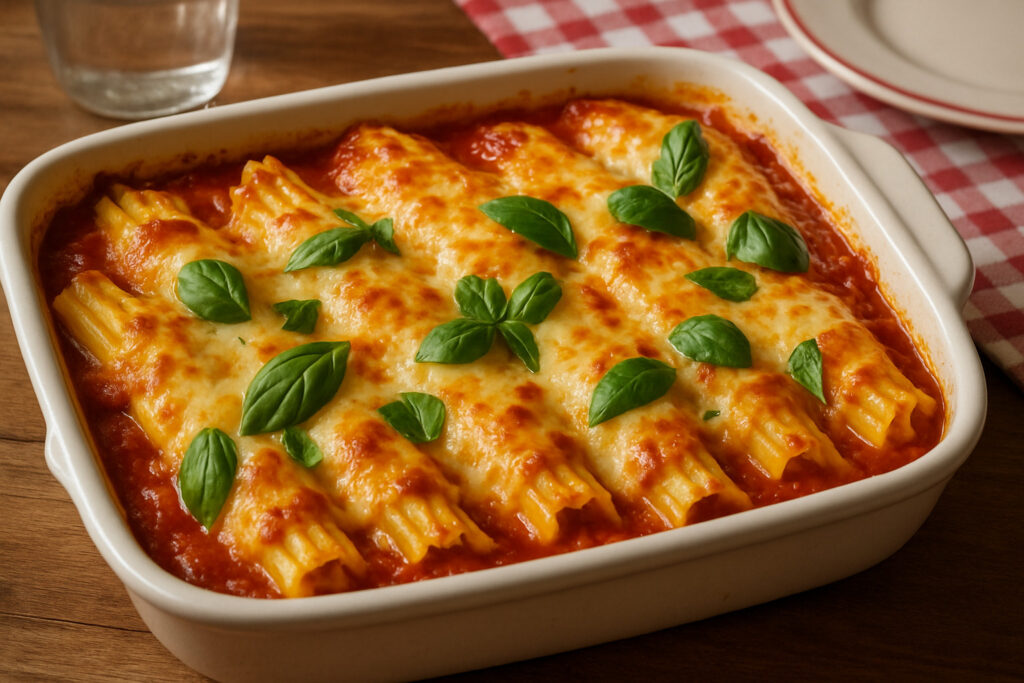
Arrange your filled shells seam-side down in the dish, then cover with remaining sauce and cheese. Cover tightly with foil for the first 30 minutes, then uncover for the final 15 minutes to get that golden, bubbly top.
Here’s the hardest part – let your budget manicotti recipe rest for 10 minutes before serving. This allows the filling to set up properly and prevents a molten cheese disaster when you cut into it.
This method serves six people generously for about $1.50 per serving – compare that to $12-15 per person at most Italian restaurants!

No-Boil Manicotti Technique
This game-changing method eliminates the most frustrating part of making manicotti – dealing with slippery, tear-prone cooked shells. The secret ingredient? Extra water mixed right into your sauce.
Mix your 24-ounce jar of marinara sauce with half a cup of water. This creates the perfect steamy environment to cook your pasta shells right in the oven. You’ll use the shells straight from the box – they’re actually sturdier when dry.
Pipe your filling into the uncooked shells, arrange them in your sauce mixture, and cover everything tightly with foil. The trapped steam does all the work, cooking the pasta to perfect tenderness in about 50 minutes.
Remove the foil for the last 10 minutes to get that gorgeous golden cheese top. The result? Perfectly cooked manicotti with fewer dishes to wash and zero torn shells to deal with.
Classic Boiled-Shell Manicotti Technique
Sometimes tradition wins, and many cooks swear by the classic method once they master the technique. The secret is the 5-minute rule – cook your shells for exactly five minutes in well-salted, lightly oiled water.
This timing leaves them firm enough to handle but pliable enough to stuff without breaking. Use a spider skimmer or slotted spoon to lift each shell gently from the water.
Immediately plunge them into an ice water bath to stop the cooking process. Pat them dry on clean kitchen towels, then return them to the original box slots to prevent sticking together.
Fresh Sheet Roll-Up Version
This professional kitchen technique creates the most neat presentation and often works better for beginners. Start by soaking no-boil lasagna sheets in hot water for about five minutes until they’re pliable.
Cut the softened sheets into 4-inch squares and pat them completely dry. Spread about two tablespoons of filling on each square, then roll them up jelly-roll style with the seam facing down in your baking dish.
Here’s a pro tip: leave the edges of your rolls slightly unsauced. This creates those crispy “best bits” that everyone fights over. The Scientific research on moisture control confirms this method provides superior texture and much easier assembly.
Variations, Storage & Troubleshooting
The wonderful thing about manicotti is how it welcomes creativity. This adaptable dish transforms easily to match different tastes, dietary needs, and whatever ingredients you have on hand.
Vegetarian lovers can pack extra nutrition into their filling by adding sautéed mushrooms, roasted red peppers, or double the spinach. A simple tablespoon of basil pesto stirred into the cheese mixture creates restaurant-quality flavor depth.
For meat lovers, browning half a pound of ground beef or Italian sausage adds hearty satisfaction. This bumps your cost up by $2-3, but it also makes the dish more filling and can easily stretch to serve eight people instead of six.
Dietary adaptations don’t have to break the bank either. Gluten-free cooks can use rice-based pasta shells. Vegan versions work beautifully with a seasoned tofu-cashew blend replacing the traditional cheeses. For lower-fat options, stick with part-skim ricotta and use a lighter hand with the mozzarella.

Make-Ahead & Freezer Tips
Here’s where manicotti really shines as a budget-friendly meal planning hero. This dish actually improves when made ahead, as the flavors have time to meld together beautifully.
You can assemble your manicotti completely and keep it in the refrigerator for up to three days before baking. For longer storage, it freezes like a dream for up to three months.
The freezing process couldn’t be simpler. Assemble your dish completely but skip the baking step. Wrap it tightly in parchment paper first, then aluminum foil. Don’t forget to label it with the contents and date.
When you’re ready to enjoy your frozen creation, thaw it in the refrigerator for 24 hours, then bake as usual with an extra 10-15 minutes. You can also bake it directly from frozen – just add 45-60 minutes to the cooking time and keep it covered for most of that period.
Common Manicotti Problems Solved
Watery filling is the most common complaint. This usually happens when ricotta isn’t drained properly or frozen spinach still has moisture. Always drain your ricotta on paper towels and squeeze that spinach until no more water comes out.
Burned edges make everyone nervous, but there’s an easy prevention method. Cover your dish with foil for the first 30 minutes of baking, then remove it to let the cheese get golden.
Chewy pasta usually means the shells were overcooked before stuffing, or there wasn’t enough sauce moisture in the dish. The pasta continues cooking in the oven, so err on the side of underdone when boiling those shells.
Bland flavor breaks our hearts because manicotti should be anything but boring. Season every component – salt that pasta water generously, taste and adjust your filling, and don’t skimp on quality sauce.
Side Dishes, Nutrition & Pairings
Creating a memorable manicotti dinner doesn’t require emptying your wallet on expensive accompaniments. The key is choosing sides that balance the rich, creamy pasta with fresh flavors and textures.
Simple arugula salad makes the perfect companion to cheesy manicotti. For about $2, you can create a restaurant-quality side that cuts through the richness with its peppery bite. Just dress fresh arugula with lemon juice, olive oil, and salt.
Garlic bread is practically mandatory with Italian dishes, and homemade versions cost a fraction of store-bought. Grab day-old Italian bread from the bakery discount rack, mix softened butter with minced fresh garlic, and toast until golden.
Roasted vegetables offer endless possibilities depending on what’s seasonal and on sale. Asparagus spears, zucchini coins, or bell pepper strips all roast beautifully with just olive oil, salt, and pepper.
The nutritional profile of homemade manicotti is surprisingly reasonable compared to restaurant versions. A typical serving contains 300-400 calories (versus 600-800 at restaurants), with 20-25 grams of protein from the cheese blend. You’ll get 35-45 grams of carbohydrates from the pasta and 12-18 grams of fat, mostly from cheese.

Wine pairing doesn’t have to break the bank either. A simple Chianti or Sangiovese under $10 pairs beautifully with tomato-based manicotti. The wine’s natural acidity cuts through the rich cheese, cleansing your palate.
Making manicotti kid-friendly requires just a few simple tricks. Chop spinach very finely so it practically disappears into the cheese mixture. Use mild mozzarella and go easy on stronger cheeses like Parmesan.
Portion planning helps control both costs and calories. Plan on 2 shells per person for a satisfying main course, 3 shells for teenagers or particularly hearty appetites, and 1 shell when serving as an appetizer.

Frequently Asked Questions about Manicotti
How do I stop the filling from being watery?
Nobody wants their beautiful manicotti turning into a soggy mess! The secret to perfect texture starts with understanding that cheese naturally contains water – and that water has to go somewhere during baking.
Your first line of defense is draining the ricotta properly. Place it on paper towels for at least 5 minutes before mixing, but 10 minutes is even better. You’ll be amazed at how much liquid comes out.
Spinach is the sneaky culprit in many watery disasters. If you’re using frozen spinach, squeeze it in a clean kitchen towel until absolutely no water comes out. Fresh spinach needs blanching first, then an ice bath shock, followed by thorough drying and chopping.
Here’s a pro tip: avoid low-fat or fat-free cheeses entirely. They’re packed with water and stabilizers that make your filling runny no matter what you do. Part-skim ricotta hits that sweet spot between health-conscious and actually delicious.
Can I stuff manicotti without boiling the shells?
Absolutely, and you might never go back to the old way once you try this! The no-boil method has become our go-to technique because it’s easier and often produces better results than wrestling with slippery, fragile cooked shells.
The magic happens with steam and patience. Mix your marinara sauce with about half a cup of extra water – this creates the moisture needed to cook the pasta in the oven. Manicotti shells are actually sturdier when they’re dry, making them much easier to stuff without tearing.
Arrange your stuffed shells in the saucy mixture, cover everything tightly with foil, and bake at 350°F for 50 minutes. Then uncover for the final 10 minutes to get that gorgeous golden cheese top.
What are the best cheeses for authentic flavor on a budget?
Getting that rich, authentic manicotti taste without spending a fortune comes down to smart cheese choices. You really only need three essential cheeses, and knowing how to buy them makes all the difference.
Ricotta forms your foundation, so don’t skimp here. Part-skim ricotta offers the best balance of flavor, texture, and price. Skip the fat-free versions entirely – they’re grainy and disappointing.
Mozzarella provides that satisfying stretch we all love. Here’s where you can save big money: buy blocks instead of pre-shredded cheese and grate it yourself. You’ll save about 30% and get better melting results.
Parmesan delivers the flavor punch that makes people think you’re a genius cook. A small wedge of real Parmigiano-Reggiano goes much further than you’d think, and a little bit transforms the entire dish.
Conclusion
Making homemade manicotti transforms your kitchen into a little corner of Italy without the hefty price tag. At The Dining Destination, we’ve found that mastering comfort food classics at home doesn’t just save money – it deepens your appreciation for authentic flavors when you encounter them during your travels.
This beloved Italian-American dish tells a beautiful story of adaptation and creativity. When you make manicotti from scratch, you’re participating in that same spirit of culinary innovation that immigrant families brought to American kitchens.
The numbers speak for themselves: your homemade version costs about $1.50 per generous serving compared to $12-15 at most restaurants. But the real value goes beyond dollars saved. You control the quality of ingredients, adjust flavors to your family’s preferences, and create meals that can be prepared ahead for busy weeknights.
The techniques you’ll master – from properly draining ricotta to achieving that perfect cheese-to-pasta ratio – will serve you well in countless other dishes. Moisture control, seasoning balance, and pasta handling are foundational skills that transform good cooks into confident ones.
Whether you choose the traditional boiled-shell method or the easier no-boil technique, you’re building culinary confidence that extends far beyond this single recipe. These same principles apply to lasagna, stuffed shells, and dozens of other comfort food favorites.
As you plan your next culinary trip, understanding how dishes are made at home makes you a more informed diner when you travel. Check out our guide to Best Unique Restaurants to see how professional kitchens lift these classic techniques, then bring those insights back to your own kitchen experiments.
Your family will thank you for mastering this timeless recipe, and your wallet will appreciate the savings that come with cooking global comfort food at home.


1 thought on “How to Make Delicious Manicotti on a Budget”
Pingback: How to Make Beef Stroganoff Fast by Using Simple Ingredients - The Dining Destination
Comments are closed.