
Why Chicken Parmesan Deserves a Spot on Your Weekly Menu
Chicken parmesan stands as one of the most beloved Italian-American comfort foods, combining crispy breaded cutlets with rich marinara sauce and melted cheese. This dish delivers restaurant-quality flavor in your own kitchen – and you can master it in under an hour.
Quick Chicken Parmesan Overview:
- Prep time: 10 minutes (pound, season, dredge)
- Cook time: 35 minutes (fry + bake)
- Total time: 45-60 minutes
- Key ingredients: Chicken breasts, panko breadcrumbs, Parmesan, mozzarella, marinara
- Essential technique: Light sauce on top only (prevents soggy crust)
- Serving temp: Internal 165°F
Despite its Italian name, chicken parmesan is actually an American invention. Italian immigrants adapted their traditional eggplant parmigiana when they finded Americans preferred meat over vegetables. The result? A dish so popular it ranks among the top non-pasta orders at Italian-American restaurants nationwide.
The beauty of homemade chicken parmesan lies in controlling the crispy-to-saucy ratio. Restaurant versions often drown the breaded cutlet in sauce, creating a soggy mess. Your home kitchen gives you the power to achieve that perfect balance – crispy golden crust meets just enough tangy marinara and stretchy mozzarella.
With proper technique and timing, you’ll have golden, juicy cutlets ready faster than takeout delivery. The secret? A streamlined approach that maximizes flavor while minimizing cleanup time.
 Pound chicken to even thickness, 2) Set up three-bowl dredging station, 3) Pan-fry cutlets until golden, 4) Top with sauce and cheese then bake, 5) Rest and garnish with fresh basil - total time 60 minutes - chicken parmesan infographic")
Basic chicken parmesan terms:
Origins & Evolution of an Icon
Here’s a fun fact that might surprise you: chicken parmesan isn’t actually Italian at all. This beloved comfort food is a pure Italian-American creation, born from immigrant ingenuity and American tastes.
The story begins with eggplant parmigiana, a traditional Southern Italian dish that layers breaded eggplant slices with rich tomato sauce and cheese. When Italian families packed their recipes and dreams for America in the early 1900s, they brought this cherished dish along.
But America changed everything. Suddenly, chicken was cheaper and more available than it had ever been back home. Italian cooks, always resourceful, swapped tender chicken breasts for the eggplant slices. What seemed like a simple substitution actually created something entirely new.
The real magic happened after World War II. As Italian-American restaurants flourished across the country, chicken parmesan became their secret weapon. By the 1950s, you could find it on menus everywhere – and diners couldn’t get enough.
The numbers tell the whole story:
- Chicken parmesan consistently ranks among the top 50 most-saved recipes on major cooking websites
- It’s the most popular non-pasta entrée at Italian-American restaurants
- A typical serving ranges from 378 to 1,135 calories, depending on how it’s prepared
Let’s clear up a common misconception: despite the name, this dish has zero connection to Parma, Italy. The “parmesan” simply refers to the Parmigiano-Reggiano cheese, not the famous Italian city. Think of it more like a cousin to Chicken Milanese – both feature crispy breaded cutlets, but chicken parm gets the full Italian-American treatment with mozzarella and marinara sauce.
| Feature | Chicken Parmesan | Eggplant Parmesan |
|---|---|---|
| Main Ingredient | Breaded chicken breast | Breaded eggplant slices |
| Origin | Italian-American | Southern Italy |
| Typical Cheese | Mozzarella & Parmesan | Mozzarella & Parmesan |
| Texture | Meaty, crispy | Tender, creamy |
| Calories (avg.) | 400-1000+ | 250-500 |
| Popularity (US) | Top non-pasta dish | Classic vegetarian entree |
Why Chicken Won America’s Heart
So why did chicken beat out eggplant for America’s affection? The answer lies in timing, taste, and pure practicality.
Protein was king in post-war America. Families wanted hearty, satisfying meals, and chicken delivered that meaty satisfaction that eggplant simply couldn’t match. Plus, chicken breast was becoming incredibly affordable as farming methods improved and supply chains expanded.
But the real secret? Pure comfort factor. There’s something magical about that combination – crispy golden coating giving way to juicy chicken, all smothered in tangy marinara and stretchy melted cheese. It hits every comfort food note perfectly.
The proof is in the popularity. Restaurant rankings consistently show chicken parmesan at the top of Italian-American favorites, and home cooks can’t resist it either. It’s the kind of dish that turns a regular Tuesday into something special – no wonder it became an American classic.
Pantry & Tool Checklist for Success in 60 Minutes
The secret to great chicken parmesan in under an hour? Having everything ready before you start. There’s nothing worse than realizing you’re missing a key ingredient when your oil is hot and ready to go.
Let’s start with your protein foundation: boneless, skinless chicken breasts are your best bet here. You’ll want to pound them to an even thickness—about ¾ inch works perfectly. This ensures they cook evenly and don’t dry out.
For that signature golden crust, you’ll need a breadcrumb blend that delivers both crunch and flavor. Panko breadcrumbs give you that satisfying crispy texture, while Italian breadcrumbs bring the seasoned flavor punch. Mix them together for the perfect coating.
The cheese game is crucial—freshly grated Parmesan and low-moisture mozzarella are non-negotiables. Your marinara sauce can be homemade or store-bought (we’ll talk strategy on that in a minute). Round out your ingredients with fresh basil, quality Greek oregano, extra-virgin olive oil, all-purpose flour, and eggs for your dredging station.
Equipment-wise, keep it simple but effective. A meat mallet (or heavy bottle in a pinch) for pounding, a cast-iron or heavy skillet for frying, and a wire rack for draining are your must-haves. You’ll also want a baking sheet, three shallow bowls for your dredging station, and an instant-read thermometer to nail that perfect 165°F internal temperature.

Choosing the Right Cheese Matters
Here’s where many home cooks go wrong—cheese isn’t just a topping, it’s the soul of your chicken parmesan. The wrong choice can turn your masterpiece into a watery mess.
Low-moisture mozzarella is your hero here. It melts beautifully without releasing excess water that would soggy up your perfectly crispy crust. Fresh mozzarella might look fancy, but save it for your caprese salad—it’ll weep all over your chicken.
For that sharp, nutty depth, freshly grated Parmigiano-Reggiano is worth the extra effort. Pre-shredded cheese contains anti-caking agents that actually prevent proper melting. Trust us, the five minutes of grating time pays off in flavor dividends.
The magic happens when you combine both cheeses—mozzarella gives you that Instagram-worthy cheese pull, while Parmesan delivers the complex flavor that makes people ask for your recipe.
Homemade vs Store-Bought Marinara
The eternal kitchen debate: make it from scratch or grab a jar? Both have their place in the chicken parmesan world.
Homemade marinara lovers, we get it. Simmering canned San Marzano tomatoes with olive oil, garlic, fresh basil, and a pinch of red pepper flakes for 30 minutes creates something magical. A food mill helps achieve that silky restaurant texture, and you control every bit of salt and sugar.
But let’s be real—sometimes you need dinner on the table fast. Quality store-bought sauce can absolutely deliver delicious results. Look for thick, robust sauces with simple ingredient lists. Check those labels for sodium and sugar content, because some brands go overboard.
Here’s the golden rule regardless of your sauce choice: less is more. A light layer on top of your cutlet keeps that crust crispy. The sauce should complement your chicken, not drown it.
Chicken Parmesan in Under 60 Minutes: Step-By-Step Blueprint
Now comes the fun part! Let’s walk through making chicken parmesan from start to finish. This streamlined approach keeps you organized while delivering restaurant-quality results in your own kitchen.
The secret to success? Multitasking and timing. While your chicken rests after frying, you can prep your baking dish. While it bakes, you can toss a salad or boil pasta. Everything flows together beautifully when you follow this blueprint.

10-Minute Prep: Pound, Season, Dredge
Start by pounding your chicken breasts to an even half-inch thickness using a meat mallet. This step is crucial—thick spots stay raw while thin spots overcook. Place the chicken between plastic wrap or parchment paper to keep things tidy.
Season generously with salt and pepper on both sides. Don’t be shy here—the seasoning needs to penetrate the meat and balance the rich cheese and sauce.
Next, set up your three-bowl dredging station. Bowl one gets all-purpose flour. Bowl two holds beaten eggs (add a splash of water to help them coat evenly). Bowl three combines panko breadcrumbs, Italian breadcrumbs, and freshly grated Parmesan for the ultimate crispy coating.
Here’s where the wet-hand/dry-hand technique saves your sanity. Use your non-dominant hand for wet ingredients (eggs) and your dominant hand for dry ones (flour and breadcrumbs). This prevents your fingers from turning into breaded clubs halfway through.
15-Minute Fry: Lock in Crunch
Heat your oil blend to 350°F in a large, heavy skillet. We recommend mixing extra virgin olive oil with sunflower oil—you get olive oil’s flavor with a higher smoke point for perfect frying.
Fry each cutlet for 3-4 minutes per side until they’re gorgeously golden brown. Don’t crowd the pan! Overcrowding drops the oil temperature and leads to soggy, greasy chicken. Work in batches if needed.
The moment they’re done, transfer the cutlets to a wire rack—not paper towels. Paper towels trap steam underneath, making your beautiful crispy coating soggy. The wire rack lets air circulate and keeps everything crisp.

20-Minute Bake: Melt & Marry Flavors
Preheat your oven to 425°F—a hot oven melts the cheese quickly without overcooking the chicken. Arrange your fried cutlets in a baking dish, leaving a little space between each piece.
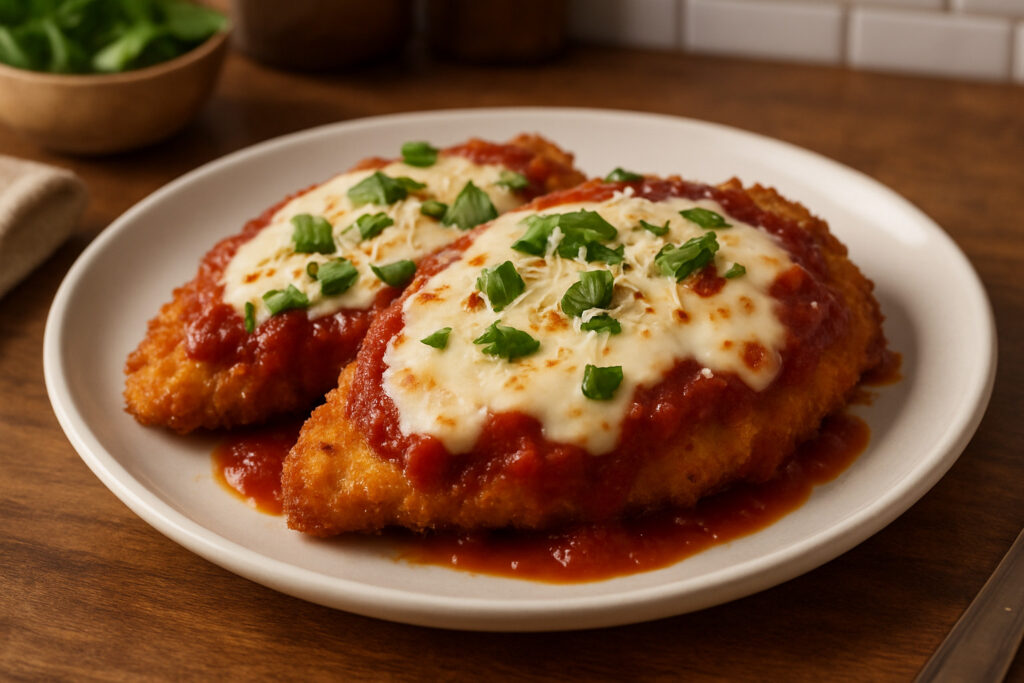
Now for the light sauce method—this is what separates homemade chicken parmesan from soggy restaurant versions. Spoon just enough marinara to lightly coat the top of each cutlet. The sauce should kiss the chicken, not drown it.
Layer on the cheese with confidence. Start with plenty of low-moisture mozzarella for that Instagram-worthy cheese pull, then add freshly grated Parmesan for sharp, nutty flavor. Some cooks add a touch of provolone for extra richness.
Bake for 15-20 minutes until the cheese bubbles and browns in spots. Use your instant-read thermometer to check that the chicken reaches 165°F internal temperature. For extra browning, hit it with the broiler for 2-3 minutes at the end—but watch carefully to prevent burning.
5-Minute Rest & Serve
Resist the urge to dig in immediately. Let your chicken parmesan rest for 5 minutes after baking. This resting time allows the juices to redistribute and prevents a molten cheese disaster when you cut into it.
While it rests, prepare your fresh basil chiffonade. Roll basil leaves tightly and slice them into thin ribbons—this classic garnish adds a pop of color and bright, aromatic contrast to the rich dish.
Plating makes all the difference. Serve over al dente pasta, alongside garlic bread, or tucked into a crusty sandwich roll. The choice is yours, but the satisfaction is guaranteed.
Pro Tips, Tweaks & Troubleshooting
Making chicken parmesan at home isn’t rocket science, but a few insider secrets will take your dish from good to restaurant-quality amazing.
The secret to the crispiest crust lies in your breadcrumb blend. Mix equal parts panko and Italian breadcrumbs, then add freshly grated Parmesan for that golden, crunchy coating. A pinch of garlic powder or dried oregano lifts the flavor even more. This combination gives you the best of both worlds—panko’s crunch and Italian breadcrumbs’ seasoning.
Here’s the golden rule that separates pros from amateurs: keep sauce on top only. Never put marinara under your cutlet. That’s a one-way ticket to soggy-bottom city, and nobody wants that disappointment on their dinner plate.
Let your breaded chicken rest for 10 minutes before hitting the hot oil. This simple step helps the coating stick better and creates a more even crust. When it’s time to drain, skip the paper towels and use a wire rack instead—this keeps air circulating and prevents steam from softening your beautiful crust.
For those avoiding gluten, swap regular breadcrumbs for gluten-free panko or finely ground almond flour. The texture stays satisfying, and the flavor remains authentic. You won’t miss a thing.
Want to lighten things up? Try the air fryer swap. Cook your breaded cutlets at 380°F for 7-8 minutes per side. You’ll get incredible crispness with minimal oil—perfect for weeknight dinners when you want comfort food without the guilt.
Planning ahead? Freeze breaded, uncooked cutlets between parchment paper. When hunger strikes, bake them straight from the freezer for 30-35 minutes. It’s like having your own frozen dinner section, but infinitely better.

Common Mistakes When Making Chicken Parmesan
Even experienced cooks stumble with chicken parmesan sometimes. Here are the pitfalls that’ll sabotage your dinner—and how to avoid them.
Uneven chicken thickness is mistake number one. Those thick spots stay raw while thin edges turn into leather. Always pound your chicken to an even half-inch thickness. Your meat mallet is your best friend here.
Cold oil is another culprit behind disappointing results. If your oil isn’t hot enough (aim for 350°F), your cutlets will absorb grease instead of crisping up. The result? A soggy, oily mess that tastes nothing like the golden perfection you’re after.
We’ve already covered this, but it bears repeating: sauce under the cutlet equals soggy bottom. Always keep that marinara on top where it belongs.
Pre-shredded cheese might seem convenient, but it’s working against you. Those anti-caking agents prevent proper melting, leaving you with stringy, uneven cheese coverage. Grate your own mozzarella and Parmesan—the extra two minutes are worth it.
Finally, don’t skip the resting period. Hot chicken parmesan straight from the oven might look ready, but give it five minutes to settle. Otherwise, your cheese slides off and all those delicious juices run out when you cut into it.
Restaurant-Style vs Family-Style vs 30-Minute Version
Different occasions call for different approaches to chicken parmesan. Understanding these three styles helps you choose the right method for your situation.
Restaurant-style chicken parmesan is pure indulgence. These versions get deep-fried in plenty of oil, then loaded with cheese and sauce. The flavor is ultra-rich and the portions are massive—perfect for special occasions when calories don’t count. Expect to spend 60-90 minutes on this version, but the results are undeniably impressive.
Family-style strikes a balance between flavor and practicality. You’ll mostly bake the cutlets with just a quick fry for color, using less oil overall. The taste stays authentic while being more manageable for home cooks. This version typically takes 45-60 minutes and feeds a crowd without breaking the budget.
The 30-minute version is your weeknight hero. Quick-fry or air-fry the cutlets, skip the final baking step, and you’re done in 25-40 minutes. It’s lighter, less messy, and still delivers that crispy, cheesy satisfaction you’re craving. Perfect for busy families who want comfort food without the fuss.
Each style has its place in your cooking repertoire. Choose based on your time, energy, and how fancy you want to get. Check out more quick Chicken Recipes for additional weeknight inspiration.
Serving, Storing & Creative Variations
The beauty of chicken parmesan lies in its versatility. This crowd-pleasing dish pairs beautifully with classic Italian sides and transforms into exciting leftovers that’ll have your family asking for seconds.
Spaghetti remains the gold standard – those long strands catch the marinara sauce perfectly while complementing the crispy cutlet. But don’t stop there. Rigatoni or penne work wonderfully too, their tube shapes holding onto every drop of sauce. For a lighter twist, try zucchini noodles (zoodles) – they add fresh crunch and keep things low-carb.
Round out your meal with warm garlic bread for sopping up extra sauce, or a crisp Caesar salad to cut through the richness. Green beans almondine or roasted broccoli add color and nutrition to your plate.

Wine lovers, reach for an Italian red – Chianti or Sangiovese complement the tomato and cheese beautifully. The acidity cuts through the richness while echoing the dish’s Italian-American roots.
Got leftovers? Lucky you! Slice that chicken parmesan and stuff it into a crusty sandwich roll for an incredible sub. Or cube it up for meal-prep containers alongside roasted vegetables and quinoa. Some adventurous cooks even dice leftover cutlets as pizza topping – trust us, it’s genius.
Make-Ahead & Freezer Playbook
Planning ahead makes weeknight dinners a breeze. Cool your fried cutlets completely before wrapping – this prevents condensation that leads to soggy breading.
Wrap each cutlet individually in plastic wrap, then aluminum foil for extra protection. They’ll keep beautifully for up to three months in the freezer. Here’s the key: store sauce and cheese separately to maintain that crispy texture we worked so hard to achieve.
When you’re ready to serve, bake frozen cutlets straight from the freezer at 425°F for 30-35 minutes. Add your sauce and cheese during the last 10 minutes, then bake until everything’s bubbling and golden. No thawing required – dinner goes from freezer to table in under 40 minutes.
Healthier or Special-Diet Spins
Chicken parmesan doesn’t have to be a guilty pleasure. A few simple swaps create lighter versions that still deliver on flavor.
Skip the frying entirely by baking breaded cutlets on a wire rack at 425°F for about 20 minutes. You’ll cut calories significantly while keeping that satisfying crunch. Almond flour breadcrumbs work wonderfully for gluten-free or low-carb versions – they crisp up beautifully and add nutty flavor.
Part-skim mozzarella melts just as well as full-fat versions, and using less Parmesan still gives you that sharp, salty bite. For our dairy-free friends, today’s plant-based mozzarella and Parmesan alternatives melt surprisingly well – look for brands specifically designed for cooking.
These adaptations prove that everyone can enjoy this beloved dinner classic, regardless of dietary needs. The crispy, cheesy, saucy magic remains intact while fitting your lifestyle perfectly.
Frequently Asked Questions about Chicken Parmesan
Let’s tackle the most common questions about chicken parmesan that home cooks ask. These answers will help you avoid the pitfalls and master this beloved comfort dish.
What’s the difference between Chicken Parmesan and Chicken Parmigiana?
Here’s the simple truth: they’re exactly the same dish! “Parmigiana” is the traditional Italian spelling, while “Parmesan” is the Americanized version that stuck in restaurants and home kitchens across the United States.
You might also see it shortened to “chicken parm” on casual menus or in family conversations. No matter what you call it, you’re getting the same delicious combination of breaded chicken cutlets topped with marinara sauce and melted cheese.
The naming confusion comes from the dish’s Italian-American roots. When Italian immigrants brought their eggplant parmigiana traditions to America and swapped in chicken, the spelling gradually shifted to match American preferences.
How do I keep the breading from getting soggy?
This is the million-dollar question that separates restaurant-quality chicken parmesan from disappointing home attempts. The secret lies in understanding moisture control.
Never put sauce underneath your cutlet. This is the biggest mistake home cooks make. The sauce should only go on top, creating a protective barrier rather than a soggy foundation.
Choose a thick marinara sauce over watery versions. Thin sauces seep through the breading and create a mushy mess. If your sauce seems too thin, simmer it for a few extra minutes to concentrate the flavors and reduce excess liquid.
Always drain fried cutlets on a wire rack, not paper towels. Wire racks allow air to circulate underneath, keeping the bottom crust crispy. Paper towels trap steam and create sogginess.
Timing matters too. Serve your chicken parmesan immediately after the cheese finishes bubbling in the oven. The longer it sits, the more the steam from the hot sauce will soften that beautiful crispy coating you worked so hard to achieve.
Can I freeze uncooked breaded chicken cutlets?
Absolutely! This is one of the best meal-prep strategies for busy weeknights. Freezing breaded cutlets actually helps the coating set even better.
Here’s the foolproof method: After breading your cutlets, place them on a baking sheet lined with parchment paper. Don’t let them touch each other – you want each piece to freeze individually first.
Once they’re completely frozen (usually 2-3 hours), transfer the cutlets to freezer bags or airtight containers. They’ll keep beautifully for up to three months.
Cook them straight from the freezer – no thawing required! Just add 5-10 minutes to your normal cooking time. If you’re baking at 425°F, plan for about 25-30 minutes total, then add your sauce and cheese for the final 10 minutes.
This freezer trick means you can always have chicken parmesan ready to go when weeknight dinner stress hits. Your future self will thank you for the prep work.
Conclusion
There’s something magical about the first bite of perfectly made chicken parmesan—that satisfying crunch giving way to juicy chicken, tangy marinara, and stretchy melted cheese. Now you have all the tools to create this Italian-American masterpiece right in your own kitchen.
The beauty of homemade chicken parmesan lies in getting that balance just right. No more soggy restaurant disappointments or waiting for delivery. In under an hour, you can serve up golden, crispy cutlets that’ll have your family asking for seconds (and thirds).
Remember the key secrets: pound your chicken evenly, keep that oil nice and hot, and always sauce on top only. These simple techniques transform ordinary ingredients into something extraordinary—a dish that brings people together around the dinner table.
Quick mastery comes with practice, but even your first attempt will likely beat most takeout versions. This globally beloved comfort dish has earned its place in kitchens worldwide for good reason—it’s satisfying, adaptable, and downright delicious.
Ready to explore more family-approved favorites? The Dining Destination is your guide to culinary trips, dining trends, and kitchen classics from New York City and beyond. Whether you’re craving more Italian-American comfort food at Italian Restaurants Near Me or looking for your next weeknight winner, our comprehensive Dinner guide has you covered.
So grab that meat mallet, heat up your skillet, and get ready to make some seriously good chicken parmesan. Your taste buds (and your family) will thank you. Happy cooking—and buon appetito!


1 thought on “How to Make Chicken Parmesan in Less Than an Hour”
Pingback: The Complete Guide to Emma Myers - The Dining Destination
Comments are closed.