
Why Chicken Milanese Mistakes Happen So Often
Chicken milanese is a classic Italian dish featuring thin, breaded chicken cutlets that are pan-fried to golden perfection. Originally from Milan, this seemingly simple recipe has become a weeknight favorite for home cooks worldwide – but it’s also where many beginners stumble.
Quick Chicken Milanese Guide:
- What it is: Thin chicken cutlets coated in flour, egg, and breadcrumbs, then pan-fried
- Origin: Milan, Italy (originally made with veal)
- Cook time: 15-25 minutes total
- Key success factors: Even thickness, proper breading technique, correct oil temperature
- Common mistakes: Uneven pounding, soggy coating, wrong oil temperature
The dish looks deceptively easy. Pound some chicken, bread it, fry it – what could go wrong?
A lot, actually.
From cutlets that cook unevenly to coatings that fall off in the pan, chicken milanese reveals every shortcut and mistake. The difference between restaurant-quality results and a disappointing dinner often comes down to just a few critical steps that many home cooks skip or rush through.
One food blogger captured this perfectly: “If you’re a little unsure about creating perfect crisp Chicken Milanese at home, look no further.” That uncertainty is exactly what leads to the most common errors.
But here’s the good news: once you understand why these mistakes happen, they’re completely avoidable. The techniques that create that coveted crispy crust and juicy interior aren’t complicated – they just require attention to detail.

Chicken milanese vocab to learn:
Avoiding Chicken Milanese Prep Mistakes
Picture this: you’re excited to make chicken milanese for dinner, but when you slice into that golden cutlet, half of it is still pink while the edges are dry as cardboard. Sound familiar? Most chicken milanese disasters happen long before the pan gets hot – they start during prep.
The culprit behind uneven cooking is almost always uneven thickness. When your chicken breast is thick in some spots and thin in others, physics takes over. The thin parts overcook while the thick centers stay raw, no matter how long you keep it in the pan.
Here’s where your meat mallet becomes your best friend. Don’t try to use a rolling pin or the bottom of a pan – you need the right tool for the job. Place your chicken between two sheets of parchment paper (this keeps your kitchen from looking like a crime scene) and gently pound from the center outward.
You’re aiming for that sweet spot of ¼ to ⅓ inch thickness throughout the entire cutlet. Run your fingers across the meat to check – it should feel uniformly flat. One culinary expert puts it perfectly: pounding chicken to an even ½ inch thickness ensures it fries evenly without needing an oven finish.
Pro tip: Kids actually love helping with this step – just make sure you supervise their technique!
Now let’s talk about something that can ruin more than just your dinner: cross-contamination. Raw chicken juice getting into your breading stations isn’t just gross – it’s dangerous. Always wash your hands after handling raw chicken and before touching anything else. Consider setting up separate cutting boards too.
Here’s a flavor mistake that breaks our hearts every time: seasoning the chicken after breading instead of before. Salt and pepper need to penetrate the meat, not just sit on top of the coating. Season your cutlets and let them sit for about 10 minutes before you start the breading process.
More info about Authentic Local Food Guides
Chicken Milanese Cutlet Sizing 101
Not all chicken pieces are created equal when it comes to chicken milanese. Starting with boneless, skinless chicken breasts of similar size sets you up for success – they’ll cook at the same rate and be ready at the same time.
Before you even think about pounding, try butterflying those thick breasts. Slice them horizontally through the middle (like opening a book) to create thinner pieces, then pound to your final thickness. This technique prevents the meat from getting tough and stringy under the mallet.
You might be tempted to use chicken tenderloins instead – they’re already thin, right? Here’s the thing: tenderloins can actually be too thin and tend to dry out quickly. Chicken breasts give you more surface area for that crispy coating and better control over the final thickness.
The fear of undercooked centers keeps many home cooks up at night, but here’s some reassurance: properly prepared cutlets at ¼ inch thickness cook completely through in just 2-3 minutes per side. The secret isn’t cooking longer – it’s getting that thickness consistent.
Chicken Milanese Flavor Foundation
There’s nothing sadder than perfectly crispy chicken milanese that tastes like cardboard. Bland results usually mean you missed opportunities to build flavor at every step of the process.
Think of seasoning as a layered approach. First, season the chicken itself with salt and pepper, then let it sit for 10 minutes. Next, add garlic powder, onion powder, and more salt to your flour dredge. Finally, boost your breadcrumb mixture with grated Parmesan, fresh herbs, and even a touch of lemon zest.
One chef shared a game-changing tip that we absolutely love: grating cheese directly into the egg wash. This creates incredible flavor and helps the breadcrumbs stick better. It’s one of those simple tricks that makes a huge difference.
Fresh herbs are where you can really make this dish shine. Finely chopped parsley, basil, or fresh thyme mixed into the breadcrumbs adds a bright, vibrant flavor that dried herbs just can’t match. Don’t skip this step – your taste buds will thank you.
The flour dredge isn’t just there to help the egg stick. It’s another chance to add flavor, so don’t waste it on plain flour. A properly seasoned flour mixture creates a more complex, delicious final result.
Breading Blunders That Ruin Crunch
The breading station is where chicken milanese magic happens – or where it all falls apart. We’ve watched countless home cooks nail the prep work, only to stumble at this crucial step. The difference between restaurant-quality crunch and disappointing sogginess often comes down to just a few breading techniques.
Let’s talk about the “mummy hands” problem first. You know what we mean – when you accidentally use the same hand for wet and dry ingredients, creating thick, gooey gloves that waste half your breading. The solution is simple: designate your left hand for egg wash duty and your right hand for breadcrumbs. This keeps your fingers clean and your breading where it belongs – on the chicken.
Egg wash ratios can make or break your coating. Too thick, and it creates uneven, gloppy spots. Too thin, and the breadcrumbs slide right off. We’ve found the sweet spot: 2-3 eggs beaten with 2 tablespoons of water or milk. Some chefs take it further by adding grated Parmesan directly to the egg wash – it improves both flavor and adhesion.
Here’s where many people go wrong: they grab whatever breadcrumbs are in the pantry. Panko breadcrumbs create a noticeably lighter, crispier crust than regular ones. Multiple recipe developers swear by them for chicken milanese. If you only have regular breadcrumbs, make sure they’re fresh and finely ground – stale breadcrumbs create a dense, chewy coating.
The resting mistake might be the most overlooked step in the entire process. After breading, your cutlets need 15-30 minutes in the refrigerator to firm up. This chilling time allows the coating to set and bond properly with the chicken. Skip this step, and you’ll watch your beautiful breading separate in the hot oil.
Before you even start breading, set up a wire rack over a baking sheet. This gives your coated cutlets a proper resting spot without sitting in their own moisture – which would make the bottom coating soggy before you even start cooking.
Scientific research on food-borne bacteria
Why Your Chicken Milanese Coating Falls Off
Nothing breaks a cook’s heart quite like watching carefully applied coating slide off into the oil like a sad, breadcrumb sweater. This frustrating problem usually has one of three causes – all completely fixable.
Moisture is the enemy of good adhesion. Even chicken that looks dry often has surface moisture that prevents proper coating attachment. Pat your chicken completely dry with paper towels before starting. Some experienced cooks go further: they salt the chicken, let it sit for 10 minutes, then pat it dry again to remove even more moisture.
That chill time we mentioned earlier isn’t just a suggestion – it’s coating insurance. During those 15-30 minutes in the refrigerator, the breading literally sets and bonds to the chicken. One recipe developer specifically notes this step prevents crumb loss during frying. Rush this, and you’ll pay for it in the pan.
The flipping rule is sacred in chicken milanese cooking: flip only once. Each additional flip risks disturbing the delicate coating. We know it’s tempting to fidget with the cutlets, but resist the urge. As one professional chef puts it: “Resist moving cutlets while frying.”
A few more adhesion secrets: tap off excess flour before moving to the egg wash, press breadcrumbs gently but firmly onto the chicken, and let each breading station do its job completely before moving to the next step.
Gluten-Free & Dairy-Free Breadings
Dietary restrictions don’t mean giving up crispy chicken milanese. We’ve tested numerous alternatives that deliver surprisingly similar results to traditional breading.
For gluten-free options, rice breadcrumbs made from crushed rice crackers work beautifully. Gluten-free panko is now widely available and performs almost identically to regular panko. Ground almonds create an interesting nutty flavor and excellent crunch, while crushed gluten-free cereals can work in a pinch.
Dairy-free adaptations are equally doable. Replace Parmesan cheese with nutritional yeast for a similar umami boost. Use coconut milk in your egg wash, or simply skip the cheese entirely and amp up the fresh herbs instead.
Egg-free alternatives require a bit more creativity. A simple flour and water paste using equal parts works as a binding agent, though the coating won’t be quite as rich. Buttermilk substitute made from non-dairy milk plus vinegar also works well. Surprisingly, aquafaba – that liquid from a can of chickpeas – creates excellent adhesion.
One home cook asked about egg substitutes and received this helpful response: “You could try mixing equal parts flour and water in place of the egg.” We’ve tested this method, and while it works, expect a slightly different texture than traditional egg-based coating.
Frying Fails: Oil, Temperature & Tools
This is where the magic happens – and where everything can go spectacularly wrong. The frying stage separates crispy chicken milanese dreams from soggy disappointments, and we’ve seen too many home cooks stumble right at the finish line.
Temperature control is absolutely everything. Get this wrong and you’re doomed from the start. Too low and your beautiful coating turns into a greasy sponge, soaking up oil like a kitchen disaster. Too high and you’ll watch helplessly as the outside burns while the inside stays raw. The sweet spot sits right at 350°F – not negotiable.
Here’s the easiest way to test your oil: drop a few breadcrumbs in and watch what happens. They should start sizzling immediately with enthusiasm, but not like they’re having a panic attack. If they just sit there looking sad, your oil’s too cool. If they turn black instantly, dial it back.
Shallow frying is your friend for chicken milanese. You don’t need a swimming pool of oil – just enough to come about halfway up your cutlet sides. This usually means about ¼ to ½ inch of oil in your pan. More oil won’t make your chicken better; it’ll just make your wallet lighter and cleanup harder.
Don’t skip the splatter guard. Trust us on this one. Chicken milanese will pop and spit, and while you might feel tough dodging hot oil droplets, your stovetop (and your arms) will thank you for the protection.
| Oil Type | Smoke Point | Flavor Impact | Best For |
|---|---|---|---|
| Extra Virgin Olive Oil | 375°F | Rich, fruity | Flavor-forward dishes |
| Regular Olive Oil | 465°F | Mild | General frying |
| Vegetable Oil | 400°F | Neutral | When you don’t want oil flavor |
| Avocado Oil | 520°F | Very mild | High-heat cooking |
Scientific research on olive oil benefits
Chicken Milanese Oil Selection Matters
The great oil debate rages on in chicken milanese kitchens everywhere. Traditional Italian cooks swear by extra virgin olive oil, claiming it adds that authentic Mediterranean soul to the dish. Others argue for neutral oils, insisting they let the chicken’s flavor shine without interference.
Extra virgin olive oil brings character to your chicken milanese. Those subtle fruity notes complement the herbs and Parmesan in your coating beautifully. Plus, you get all those antioxidants and that authentic Italian feel. It’s what nonnas have been using for generations, after all.
But here’s the thing – neutral oils have their place too. They offer higher smoke points, which means more forgiveness if your temperature control isn’t perfect yet. They’re also easier on the budget and won’t compete with your carefully crafted seasoning blend.
If you’re torn between authenticity and practicality, try a 50/50 mix of olive oil and a neutral oil. You’ll get some of that Mediterranean flavor with extra safety margin for temperature control.
One important note about flavor transfer: If you’re making multiple batches (and you probably should be), strain your oil between rounds. Those little burnt bits from the first batch can make your second batch taste bitter and look spotty.
Chicken Milanese Golden-Brown Checklist
Perfect chicken milanese has a look that’s unmistakable – that gorgeous golden-brown color that makes your mouth water before you even take a bite. But achieving it consistently requires attention to specific details.
Your cutlets should have an even golden color across the entire surface, with no pale patches hiding in corners or dark spots that scream “I got impatient with the temperature.” The coating should look set and confident, not wet or weepy.

Resist the urge to crowd your pan. Cook only 1-2 cutlets at a time, even if it feels painfully slow. Overcrowding drops your oil temperature faster than you can say “soggy coating,” and creates uneven cooking that’ll break your heart. Work in batches and keep finished cutlets warm in a 200°F oven – patience pays off here.
Use a meat thermometer if you’re nervous about doneness. The internal temperature should hit 165°F, but at proper thickness, this happens quickly – usually just 2-3 minutes per side. Don’t overthink it.
The moment your chicken milanese comes out of the oil, transfer it immediately to a wire rack set over a baking sheet. This prevents soggy bottoms and keeps that coating crispy. Paper towels work in a pinch, but wire racks are the professional move.
Season while the coating is still hot – a light sprinkle of salt right after frying helps the seasoning stick and gives you that final flavor boost that makes all the difference.
Serving, Storage & Leftover Creativity
The magic of chicken milanese doesn’t stop when you turn off the heat. How you plate, store, and transform leftovers can turn a good meal into a memorable dining experience – or save it from becoming a soggy disappointment.
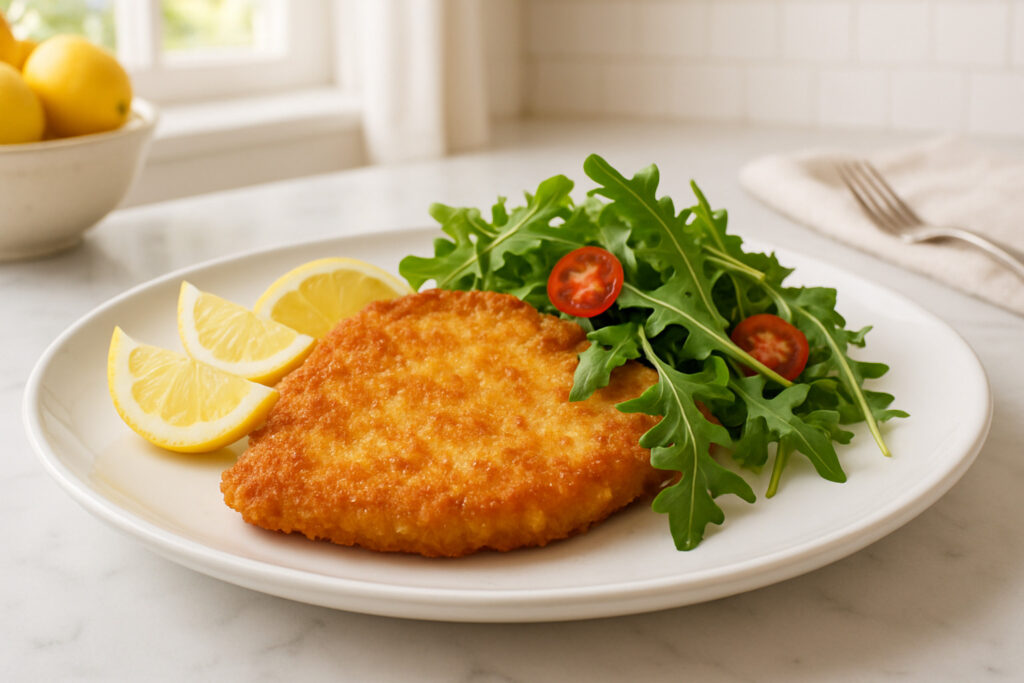
The classic Italian presentation is beautifully simple: place your golden cutlet on a plate and top with a handful of peppery arugula dressed with just lemon juice and good olive oil. The greens cut through the richness perfectly while adding color and freshness. A few cherry tomatoes and shaved Parmesan complete the picture.
Never skip the lemon wedges. That bright acid is essential – it cuts through the richness and adds the fresh finish that makes chicken milanese sing. Squeeze it directly over the hot cutlet so the juices soak into the crispy coating.
Here’s where American and Italian customs differ: traditionally, Italians serve the cutlet as a second course after pasta. But for busy weeknight dinners, there’s nothing wrong with pairing it alongside buttered pasta or creamy risotto. The key is balance – you want something that complements rather than competes.
Storage success starts with proper cooling. Let your cutlets cool completely before storing, then layer them between parchment paper in airtight containers. They’ll keep in the freezer for up to two months, but don’t stack them directly or they’ll stick together like glue.
Reheating is where most people go wrong. Skip the microwave entirely – it turns crispy coatings into rubber. Instead, use an air fryer at 375°F for 3-4 minutes, or pop them in a 400°F oven on a wire rack for 8-10 minutes. The wire rack prevents soggy bottoms while the high heat restores that coveted crunch.
Leftover change is where creativity shines. Slice that cutlet and layer it on crusty bread with mayo, arugula, and tomato for an incredible Italian-inspired sandwich. It’s comfort food that feels sophisticated.
More info about Best Culinary Experiences
Classic & Modern Chicken Milanese Sides
The beauty of chicken milanese lies in its versatility. Traditional Italian sides focus on simplicity and balance – that rich, golden cutlet needs bright, acidic, or light accompaniments to shine.
Classic Italian pairings honor the dish’s Milanese roots. Risotto Milanese, with its saffron-infused rice, comes from the same region and creates a luxurious combination. A simple tomato-basil salad with good olive oil and balsamic provides the acid balance that makes everything taste brighter. Roasted vegetables like zucchini, bell peppers, and eggplant add color and earthiness without overwhelming the star.
Modern interpretations open up exciting possibilities. Quinoa grain bowls turn the dish into a complete, protein-packed meal that feels both healthy and satisfying. Cauliflower rice offers a low-carb option that soaks up all those delicious flavors. For the adventurous, an Asian fusion approach – serving over fried rice with a soy-ginger sauce – creates an unexpected but delicious combination.
Wine pairing wisdom suggests crisp whites like Pinot Grigio or Sauvignon Blanc that complement without overwhelming. If you prefer red, choose something light like Chianti that won’t compete with the delicate coating.
The secret is textural and flavor contrast – your sides should provide what the crispy, rich chicken doesn’t, creating a harmonious plate that keeps every bite interesting.
Repurposing Leftover Chicken Milanese
Leftover chicken milanese is actually a gift. That crispy, flavorful cutlet becomes the foundation for completely different meals that feel fresh and exciting.
Sandwich creativity knows no bounds. The classic Italian approach layers the cutlet with mayo, arugula, and tomato on crusty bread – simple but sophisticated. For comfort food lovers, top it with marinara sauce and mozzarella for an instant chicken Parmesan sandwich. Vietnamese-inspired variations with pickled vegetables and herbs create an unexpectedly delicious fusion.
Grain bowl changes turn leftovers into healthy, complete meals. Slice the cutlet and serve over quinoa or farro with roasted vegetables and lemon vinaigrette. Top with fresh herbs and avocado for a meal that feels both nourishing and indulgent. The crispy coating adds texture that makes grain bowls infinitely more satisfying.
Pasta integration opens up even more possibilities. Chop the cutlet and toss with carbonara for extra richness, or layer it in lasagna for additional protein. Serving over cacio e pepe creates an indulgent combination that feels like a restaurant special.
The Parmesan bake change is pure genius: top leftover cutlets with marinara sauce and mozzarella, then bake until the cheese melts. You get chicken Parmesan without any of the extra breading work.
One creative home cook shared serving it “on mashed potatoes with artichoke sauce” – proving that good leftovers inspire endless creativity. The key is thinking of that crispy cutlet as a versatile protein that can adapt to whatever flavors you’re craving.
Frequently Asked Questions about Chicken Milanese
What makes chicken milanese different from schnitzel?
This is probably the most common question we get about chicken milanese, and it’s a great one! While both dishes look similar at first glance – thin, breaded cutlets that are golden and crispy – they come from completely different culinary traditions.
Chicken milanese hails from Milan, Italy, and typically includes grated Parmesan cheese mixed right into the breadcrumb coating. This gives it a nutty, savory depth that’s distinctly Italian. The traditional serving style is equally important – it’s often topped with a fresh arugula salad dressed simply with lemon juice and olive oil, creating a perfect balance of rich and fresh flavors.
Schnitzel, on the other hand, comes from Austria and Germany. The breading is usually plain breadcrumbs without cheese, and it’s traditionally served with just lemon wedges and classic German sides like potato salad or sauerkraut. The flavor profile is cleaner and more straightforward, letting the crispy coating and tender meat shine without additional complexity.
Both are delicious, but chicken milanese tends to be more herb-forward and cheese-improved, while schnitzel celebrates simplicity and pure technique.
How do I keep the crust crispy when reheating?
We can’t stress this enough – never, ever use a microwave to reheat chicken milanese! The microwave will turn your beautiful crispy coating into a soggy, chewy mess in seconds. We’ve seen too many perfectly good leftovers ruined this way.
The secret to maintaining that coveted crunch is using methods that circulate hot, dry air around the cutlet. An air fryer is your best friend here – just pop the cutlet in at 375°F for 3-4 minutes, and it’ll come out almost as crispy as when it was first cooked.
If you don’t have an air fryer, your regular oven works beautifully too. Preheat it to 350-400°F and place the cutlet on a wire rack set over a baking sheet. This setup is crucial because it allows air to circulate underneath, preventing the bottom from getting soggy. Heat for 8-12 minutes, and you’ll have crispy chicken milanese that tastes freshly made.
Pro tip: If the coating looks a bit dry, you can lightly mist it with oil spray before reheating. This helps restore some of that golden shine and crispiness.
Can I bake or air-fry instead of pan-frying?
Absolutely! While traditional pan-frying gives you that authentic Italian experience, both baking and air-frying can produce excellent results with significantly less oil. Many home cooks actually prefer these methods for their convenience and health benefits.
For oven-baked chicken milanese, preheat your oven to 425°F – this high heat is essential for achieving crispiness. Place your breaded cutlets on a wire rack set over a baking sheet (seeing a pattern here with the wire racks?), then lightly spray or brush them with oil. Bake for 12-15 minutes, flipping once halfway through. The result is surprisingly crispy and much less messy than stovetop frying.
Air-frying works wonderfully too, and it’s probably the closest you’ll get to traditional frying without actually frying. Cook at 400°F for 8-10 minutes, flipping the cutlets halfway through. The circulating hot air creates an incredibly crispy exterior while keeping the chicken juicy inside.
Both alternative methods require that light coating of oil to achieve golden browning – don’t skip this step thinking you’ll save calories. That small amount of oil is what triggers the browning reaction that gives you both color and flavor in your chicken milanese.

Conclusion
Mastering chicken milanese is really about understanding why each step matters. From achieving uniform thickness to maintaining proper oil temperature, every detail contributes to that perfect crispy exterior and juicy interior that makes this dish so beloved.
The most important lesson? Don’t rush the process. Take time to pound the chicken evenly, let the breaded cutlets rest, and maintain proper frying temperature. These small investments in technique pay huge dividends in the final result.
We’ve found that once home cooks understand these fundamentals, they gain confidence to experiment with variations – different herbs in the breading, creative serving styles, or dietary adaptations. Chicken milanese becomes not just a recipe to follow, but a technique to master and make your own.
The beauty of avoiding these common mistakes isn’t just better-tasting food – it’s also about reducing food waste. When your cutlets turn out perfectly the first time, you’re not throwing away failed attempts or settling for disappointing dinners.
At The Dining Destination, we believe that understanding the ‘why’ behind cooking techniques transforms good home cooks into confident ones. Chicken milanese is an perfect example – a simple dish that teaches fundamental skills applicable to countless other recipes.
Ready to explore more culinary trips? More info about Best Food Destinations can guide you to authentic experiences where you can taste the dishes that inspire our cooking at home.