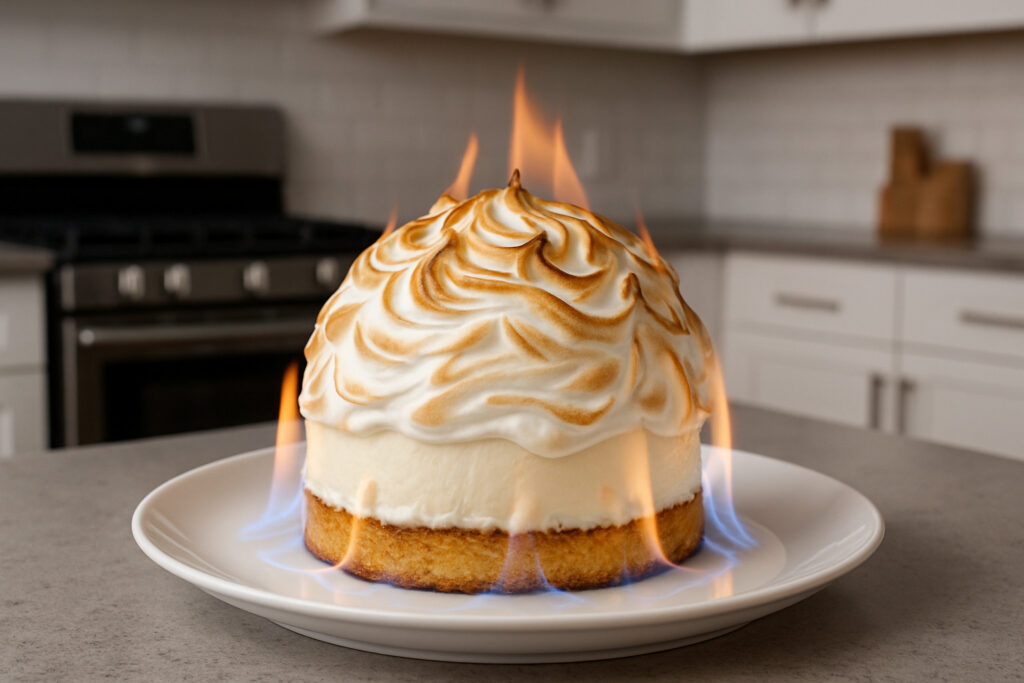
Why Baked Alaska Captivates Food Lovers Worldwide
Baked Alaska is a dessert consisting of ice cream and cake topped with browned meringue that’s briefly baked or torched to create a stunning hot-and-cold contrast.
Quick Facts About Baked Alaska:
- Components: Sponge cake base, ice cream center, toasted meringue exterior
- Origin: Created in 1876 at Delmonico’s restaurant in New York City
- Science: Meringue acts as insulation, protecting ice cream from heat
- Cooking: Baked at 425-500°F for 3-10 minutes or torched with kitchen torch
- Calories: 330-679 per serving depending on recipe
- Alternative names: Omelette Norvégienne, Bombe Alaska
This show-stopping dessert seems to defy all logic – how can you bake ice cream without melting it? The answer lies in 19th-century science. Count Rumford finded that whipped egg whites have incredibly low thermal conductivity, creating a perfect insulating barrier.
Originally called “Alaska Florida” at Delmonico’s, this dessert was renamed Baked Alaska to honor America’s purchase of Alaska. The name perfectly captures the dessert’s essence – the contrast between Alaska’s frozen wilderness and Florida’s tropical heat.
For food lovers seeking authentic culinary experiences, Baked Alaska represents the ultimate dining theater. It’s surprisingly simple to make at home, requiring no special equipment beyond basic kitchen tools. The wow factor comes from understanding the science behind the magic.
Whether you’re planning an unforgettable dinner party or exploring classic American desserts, mastering Baked Alaska opens doors to countless variations – from brownie bases to flambéed presentations that rival any fine dining establishment.

Quick baked alaska definitions:
Understanding Baked Alaska: Origins, Science & Allure
The fascinating story of Baked Alaska starts with a curious scientist named Benjamin Thompson, better known as Count Rumford. Back in 1804, this brilliant mind spent six days experimenting with something that seemed impossible – baking ice cream without melting it. His breakthrough findy about meringue’s insulating properties became the foundation for one of America’s most show-stopping desserts.
Fast forward to 1867, when Chef Charles Ranhofer at New York City’s famous Delmonico’s restaurant created something spectacular. He called it “Alaska Florida” to celebrate America’s purchase of Alaska from Russia – a whopping $7.2 million deal that worked out to about 2 cents per acre. Talk about a bargain! The name was later shortened to Baked Alaska in 1876, perfectly capturing that amazing hot-meets-cold magic.
Here’s where it gets interesting – the French were already making their own version called “omelette norvégienne” (Norwegian omelette). A Parisian chef at the World’s Fair came up with this name after mistakenly thinking Bavaria was in Norway. It’s a perfect example of how great culinary ideas travel and transform across different cultures.
The science behind Baked Alaska is actually pretty simple once you understand it. When you whip egg whites, you’re trapping thousands of tiny air bubbles. These bubbles create an incredible thermal barrier with extremely low conductivity – basically nature’s perfect insulation. When you pop that assembled dessert into a blazing 500°F oven for just 2-3 minutes, the meringue turns golden and gorgeous while your ice cream stays completely frozen.
From a nutritional perspective, you’re looking at anywhere from 330 to 679 calories per serving, with 6 to 11 grams of fat and 44 to 72 grams of sugar. The wide range depends on your ice cream choices, cake base, and how generous your portions are – most recipes serve between 6 to 12 people.
Want to dive deeper into the history? Check out Meet Baked Alaska’s Prototype for even more fascinating details. And if you’re curious about the European influences that shaped this American classic, our guide to French Desserts has you covered.
Components & Ingredient Selection
Creating the perfect Baked Alaska is like conducting a symphony – every ingredient plays a crucial role in this temperature-defying masterpiece. The beauty lies in the simplicity of components working together to create something truly magical.

The foundation of your Baked Alaska starts with the cake base, which serves as both structural support and flavor companion to your ice cream. Traditional sponge cake remains the classic choice with its light, airy texture that doesn’t compete for attention. However, many home bakers are finding that a rich brownie base creates what they call a “tastier AND easier” option that adds decadent chocolate notes.
Pound cake offers another delightful alternative, providing density that holds up beautifully and can be improved with a splash of rum or liqueur. For those with dietary restrictions, a gluten-free almond cake works wonderfully without sacrificing flavor or structure.
The heart of your dessert – the ice cream – deserves premium quality ingredients. Madagascar vanilla remains the gold standard, offering a clean, neat flavor that lets the contrast between hot and cold shine. But don’t be afraid to get creative with your selections.
Neapolitan layers create stunning visual appeal when you slice through the finished dessert, revealing stripes of vanilla, strawberry, and chocolate. Some adventurous bakers create a colorful mosaic by alternating small and large scoops of different flavors, or they incorporate sorbet layers for bright, refreshing bursts of flavor.
The meringue component is where the real magic happens. Swiss meringue provides the best stability and that gorgeous glossy finish that photographs so beautifully. You’ll need 6 to 8 egg whites at room temperature, along with the right sugar-to-egg ratio for perfect peaks.
Here’s a pro tip: adding 1/4 teaspoon of cream of tartar stabilizes your meringue, preventing it from collapsing over the cold ice cream surface. This small addition makes the difference between a meringue that holds its decorative swirls and one that deflates disappointingly.
| Base Type | Pros | Cons | Best For |
|---|---|---|---|
| Sponge Cake | Traditional, light texture | Can be bland | Classic presentations |
| Brownie | Rich flavor, easier to make | Denser, more calories | Chocolate lovers |
| Pound Cake | Sturdy, absorbs liqueurs well | Can overpower ice cream | Make-ahead versions |
Equipment-wise, you’ll need a 3-quart metal bowl for shaping your ice cream dome, either a kitchen torch or an oven that reaches 500°F, an electric mixer for whipping meringue to stiff peaks, and an offset spatula for smooth, professional-looking application.
The wonderful thing about Baked Alaska is that once you understand these basic components, you can experiment with confidence. Our Innovative Restaurant Concepts article explores how modern chefs are reimagining these classic combinations, turning this 19th-century dessert into contemporary culinary art.
Step-by-Step: How to Make Classic Baked Alaska
Making Baked Alaska at home is surprisingly straightforward once you understand the timing. The secret lies in proper planning – while the entire process spans about 8 hours including freezing time, you’ll only spend about 45 minutes actively working.
Here’s how the timeline breaks down: If you’re feeling ambitious, bake your cake base the day before and let it cool completely overnight. On serving day, start your ice cream dome in the morning since it needs at least 2 hours to freeze solid. The afternoon is perfect for whipping meringue and assembly, which takes about 30 minutes of hands-on work. Save the dramatic finale – toasting the meringue – for just before you serve.

Food safety deserves attention with this dessert. If you’re concerned about raw eggs, use pasteurized eggs for your meringue or make Swiss meringue, which cooks to 160°F. Keep that ice cream frozen solid until the very last moment of assembly. Once you’ve torched the meringue, serve immediately for the best experience. Any leftovers can go back in the freezer, though the meringue will become quite firm.
Prepping the Ice Cream Dome for Baked Alaska
Creating the perfect ice cream dome is where the magic begins. You’ll need a 3-quart metal bowl – metal works better than glass or plastic because it conducts cold more efficiently, helping your ice cream freeze evenly.
Line your bowl completely with plastic wrap, leaving plenty of overhang. This makes unmolding so much easier later. Some bakers brush the plastic wrap lightly with vegetable oil, but it’s not essential if your plastic wrap coverage is thorough.
Let your ice cream soften at room temperature for about 10 minutes. You want it soft enough to scoop easily but not melting into soup. This is where you can get creative with a mosaic effect – alternate small and large scoops of different flavors to create beautiful color layers when you slice the finished dessert.
Work quickly but gently as you pack the ice cream into your lined bowl. Press just enough to eliminate air pockets while keeping those distinct color layers intact. Some bakers sprinkle chocolate wafer crumbs between layers for extra texture, which adds a delightful surprise.
Smooth the flat surface that will eventually sit on your cake base, then cover tightly and freeze for at least 2 hours. Your dome can actually stay frozen for up to 3 days if wrapped properly, making this step perfect for advance preparation.
Baking or Sourcing the Cake Base
Your cake base has two important jobs: supporting the weight of that ice cream dome and complementing its flavors without competing. Fresh-baked cake always wins, but high-quality store-bought works when time is tight.
Vanilla sponge cake remains the traditional choice for good reason. Its light, airy texture won’t overwhelm your ice cream flavors, and it bakes beautifully at 350°F for 25-30 minutes. You’ll know it’s done when a skewer inserted in the center comes out clean.
Many experienced bakers swear by brownie bases instead, calling them “both tastier AND easier than sponge cake.” The dense, fudgy texture provides excellent structural support, and let’s be honest – who doesn’t love the combination of brownie and ice cream? Use your favorite recipe or a quality mix, baking in a 9-inch round pan.
Pound cake offers another excellent option, especially if you want to add a splash of liqueur. Its sturdy texture holds up beautifully, and you can brush it with cherry or orange liqueur for extra sophistication.
Planning ahead? Cake bases freeze beautifully for up to one month when wrapped properly. This strategy streamlines your Baked Alaska timeline significantly, leaving only assembly and that dramatic toasting for serving day.
Whipping the Perfect Meringue
The quality of your meringue can make or break your Baked Alaska. Room-temperature egg whites whip to much greater volume than cold ones, so plan accordingly. The addition of cream of tartar provides crucial stability that prevents your meringue from collapsing over the cold ice cream.
Swiss meringue delivers the best results with its superior stability and gorgeous glossy finish. Start by combining your egg whites and sugar in the mixer bowl, then heat the mixture over simmering water while whisking constantly until it reaches 160°F. Transfer to your stand mixer and whip on high speed for 5-6 minutes until you achieve stiff, glossy peaks.
Success depends on a few critical factors. Your bowl and whisk must be spotlessly clean – even a trace of fat residue will prevent proper whipping. Add the cream of tartar early in the whipping process for maximum stability. Stop beating as soon as you reach stiff, glossy peaks – overbeating can cause the meringue to become grainy.
Use your meringue immediately for the best results. While meringue powder mixed with water creates acceptable results for casual occasions, nothing matches the texture and stability of fresh meringue for your special Baked Alaska.
Assembling & Sealing
Assembly time requires confidence and swift movements to minimize ice cream melting. Have all your components ready and try to work in the coolest part of your kitchen.
Start by placing your completely cooled cake on a parchment-lined baking sheet. If you’re using the liqueur improvement, now’s the time to brush your cake lightly with cherry or orange liqueur.
Quickly invert your frozen ice cream dome onto the center of the cake. Remove the plastic wrap immediately – don’t let it stick to the ice cream. Your dome should sit securely without hanging over the cake edges too much.
Now comes the crucial part: meringue application. Working as rapidly as possible, spread meringue over the entire assembly using an offset spatula. Complete coverage is essential – any exposed ice cream will melt during the toasting process. Create decorative peaks and swirls as you work for visual appeal.
Return your assembled Baked Alaska to the freezer for at least 30 minutes before the final toasting step. This ensures the ice cream stays completely solid during the high-heat finale.
Toasting the Meringue on Your Baked Alaska
This is the moment that transforms your dessert from impressive to absolutely spectacular. You have two excellent methods: oven broiling or kitchen torch technique.
For the broiler method, preheat your broiler and position the rack about 12 inches below the heating element. Watch constantly – meringue browns incredibly quickly! Broil for 3-4 minutes until you achieve even golden color with appealing dark spots.
The kitchen torch technique offers more control and precision. Hold the torch about 6 inches from the surface, moving in circular motions for even browning. Many professional chefs prefer this method because it creates beautiful caramelized patterns and prevents the over-browning that can happen with broilers.
For the ultimate dramatic presentation, try flambéing. Warm 2-3 tablespoons of dark rum or cognac in a small pan, pour it over your toasted Baked Alaska, and ignite carefully for incredible tableside theater. The alcohol burns off quickly, leaving only improved flavor behind.
Always keep a damp towel nearby when flambéing, and ensure good ventilation in your kitchen. Safety first, drama second!
For more inspiring presentation ideas and techniques, check out Baked Alaska Media for professional photos and creative approaches.
Creative Variations & Dietary Twists
The beauty of Baked Alaska lies in its adaptability – this classic dessert welcomes creative twists while maintaining its essential hot-cold magic. Whether you’re accommodating dietary restrictions or simply want to put your own spin on tradition, countless variations await your exploration.

Individual portions transform this grand dessert into personal treats that are both quicker and easier to serve. These cupcake-sized Baked Alaskas use muffin tins filled with brownie batter as bases. Top each with a perfect scoop of ice cream, freeze until solid, then crown with swirled meringue before torching. Guests love having their own personal Alaska to conquer!
The Bombe Alaska takes theatrical presentation to new heights with tableside flambéing. Pour warmed dark rum over your finished dessert and ignite carefully for dramatic effect. The alcohol burns off quickly, leaving behind a subtle warmth that complements the cold interior beautifully.
For those seeking molecular gastronomy trips, Frozen Florida completely reverses the concept. Created in 1969 by physicist Nicholas Kurti, this playful variation features a frozen meringue shell filled with hot liquor – literally turning Baked Alaska inside-out!
Dietary adaptations ensure everyone can enjoy this spectacular dessert. Vegan meringue made with aquafaba (the liquid from canned chickpeas) whips surprisingly well when you add cream of tartar for stability. Use three tablespoons of aquafaba for each egg white the recipe calls for.
Gluten-free versions work wonderfully with almond flour cakes or flourless chocolate brownie bases. Many home bakers report excellent results using quality gluten-free pound cake mixes as shortcuts.
Reduced-sugar options don’t sacrifice the essential contrast that makes this dessert special. Sugar-free ice creams pair beautifully with meringues sweetened with stevia or monk fruit, creating lighter versions that still deliver the wow factor.
Flavor innovations keep this classic feeling fresh and exciting. Sorbet layers create stunning visual appeal when you alternate colorful fruit sorbets with traditional ice cream. Seasonal themes might include pumpkin ice cream with spiced cake for autumn entertaining, or fresh strawberry-basil combinations that celebrate summer’s bounty.
Boozy improvements add sophisticated depth – try brushing your cake with coffee liqueur, using rum raisin ice cream, or adding a splash of whisky to your meringue for grown-up flavor complexity.
The key to successful variations lies in maintaining the fundamental structure while expressing your creativity through flavors and presentation. Each twist should improve rather than compete with the dessert’s inherent drama.
Our Best Culinary Experiences guide explores how innovative chefs worldwide are reinventing classic desserts like Baked Alaska while honoring their timeless appeal.
Serving, Storage & Presentation Ideas
The moment you present Baked Alaska to your guests is pure magic. This isn’t just dessert – it’s dinner theater that transforms any meal into an unforgettable experience.
Creating Tableside Drama
Nothing beats the excitement of finishing your Baked Alaska right in front of your guests. Transport the assembled, frozen dessert to your dining area, then torch or flambé where everyone can watch. The sweet aroma of caramelizing meringue fills the room while flames dance across the golden peaks – it’s theatrical dining at its finest.
For the ultimate show-stopper, try the flambé technique. Warm a few tablespoons of dark rum or cognac, pour it over your torched meringue, and carefully ignite. The blue flames create an almost mystical effect that’ll have your guests reaching for their phones.
Perfect Sauce Pairings
The beauty of Baked Alaska lies in temperature contrasts, so accept this theme with your accompaniments. Hot chocolate sauce amplifies the hot-cold experience – imagine warm, velvety chocolate meeting frozen ice cream and toasted meringue.
Fruit coulis adds a bright, acidic note that cuts through the richness beautifully. Raspberry and strawberry work particularly well, their tartness balancing the sweet meringue. A caramel drizzle brings luxurious richness without overwhelming the delicate vanilla flavors.
Make-Ahead Magic
Here’s where Baked Alaska truly shines – it’s actually better when made ahead. You can assemble the entire dessert up to 48 hours before serving. Just wrap it tightly in plastic wrap, then aluminum foil, and store in your freezer. The meringue acts as a protective shell, preventing ice crystals from forming.
This make-ahead advantage transforms stressful dinner parties into relaxed celebrations. While your guests enjoy the main course, your dessert waits patiently in the freezer, ready for its dramatic finale.
Slicing Like a Pro
The key to beautiful Baked Alaska slices lies in your knife technique. Use a sharp, serrated knife and run it under hot water before each cut. Clean the blade between slices to maintain those picture-perfect portions that showcase the golden meringue exterior and colorful ice cream layers inside.
Smart Storage Solutions
Your ice cream domes stay perfect for up to three days when wrapped properly. Cake bases can be frozen for a full month – talk about meal planning made easy! Even assembled Baked Alaska handles storage gracefully, though leftover meringue will firm up in the freezer (it’s still delicious, just different in texture).
Restaurant-Quality Plating
Present individual slices on chilled plates – this small detail keeps everything at the perfect temperature longer. Drizzle your chosen sauce artistically around the plate’s edge, then add a few fresh berries or a delicate mint sprig for that professional touch.
Our Culinary Art Exhibitions article showcases how professional chefs lift classic desserts through innovative plating and presentation techniques that you can easily adapt at home.

Frequently Asked Questions about Baked Alaska
Why doesn’t the ice cream melt?
The science behind Baked Alaska relies on meringue’s remarkable insulating properties. Whipped egg whites contain countless air bubbles that act as thermal barriers. When you bake at 500°F for just 2-3 minutes, heat browns the meringue surface while barely penetrating to the ice cream core. Count Rumford’s 1804 experiments proved this principle, showing that meringue has extremely low thermal conductivity – similar to how a down jacket keeps you warm by trapping air.
How far in advance can I assemble baked Alaska?
You can assemble Baked Alaska completely up to 3 days ahead. Wrap the meringue-covered dessert tightly in plastic wrap, then aluminum foil to prevent freezer burn. The assembled dessert actually improves with time as flavors meld and the structure sets. However, only torch or broil the meringue just before serving for optimal texture and appearance.
Is a kitchen torch safer than broiling?
Both methods work safely when used properly. Kitchen torches offer more control and precision, allowing you to create beautiful caramelized patterns. Hold the torch 6 inches away and move continuously to prevent burning. Broiling works well too – position the rack 12 inches below the element and watch constantly. The broiler method browns more evenly but offers less artistic control. Many professional chefs prefer torching for the superior visual results and reduced risk of overheating the ice cream.
Additional Quick Answers:
Can I use store-bought components? Absolutely! High-quality store-bought pound cake and premium ice cream create excellent results. The key is proper assembly and meringue technique.
What if my meringue deflates? This usually indicates under-whipping, dirty equipment, or missing cream of tartar. Start fresh with clean tools and room-temperature eggs.
How long does it stay frozen after torching? Baked Alaska holds its shape for 20-30 minutes at room temperature, giving you flexibility for service and photos.
Conclusion
There’s something magical about serving Baked Alaska – watching your guests’ faces light up as you torch the meringue tableside, knowing you’ve just created something that seems to defy the laws of physics. You’ve mastered a dessert that connects you to culinary history while proving that the most impressive treats often come from understanding simple science.
This hot-meets-cold marvel has been wowing diners since 1876, and now you’re part of that tradition. Whether you stick with the classic vanilla sponge and premium ice cream combination or venture into brownie bases and creative flavor combinations, you’ve got the techniques to make every occasion special.
The beauty of Baked Alaska lies not just in its dramatic presentation, but in its flexibility. Vegan versions with aquafaba meringue, gluten-free cake bases, and individual cupcake portions mean you can adapt this showstopper for any dietary need or gathering size. The core magic remains the same – that perfect moment when your kitchen torch creates golden peaks over frozen perfection.
Remember what makes the difference: keeping everything properly frozen, working quickly during assembly, and embracing the theatrical moment of final torching. Don’t worry if your first attempt isn’t picture-perfect – even a slightly imperfect Baked Alaska will still earn you applause and requests for the recipe.
The Dining Destination believes every home cook deserves to create restaurant-quality experiences. Now that you’ve conquered this culinary challenge, why not explore more ways to bring exceptional dining into your world? Our guide to Best Unique Restaurants showcases how innovative chefs worldwide are reimagining classic techniques – just like you’re doing in your own kitchen.
Your Baked Alaska journey starts with that first confident torch stroke. Trust the science, accept the drama, and get ready to become the host everyone talks about long after the last spoonful disappears.